|
Chapter
3.0 Level
Walkthroughs
Ok, you've learned a
lot about how to play
Wolfenstein, what you'll
encounter, the cheats
(ugh...) and just about
everything else. Now,
you're ready to play
this bad-boy!
Well, for starters,
run Wolf. Select the New
Game option from the
menu, (see section
2.2.1) and select your
desired episode (see
section 2.2.1.1). Again,
I recommend playing
Wolfenstein from
episodes 1-6 in that
order. They each get
tougher and tougher!
Once you've selected
your episode, you'll be
taken to the screen
where you can select
your difficulty (see
section 2.2.1.2). All of
these strategies will be
from the difficulty
"Bring 'em On". The maps
also show enemies for
Death Incarnate,
though.
Also remember, each
map and strategy shows a
very direct way to beat
each level. You don't
have to go the way I say
at all. If you're low on
health, ammo, just want
to wonder around or are
competing for ratios and
score, (see section
2.8.3) go ahead and
explore each level.
There are also level
"Hot Spots" throughout
the walkthrough, that
show a point of
interest/action in the
level. They are labeled
on the maps as large H's
with a number next to
them. Use the number to
identify the hot
spot.
Also, here is a
little glossary of level
architecture terms I use
in the walkthroughs, so
you don't get
confused:
- Room
- Umm...a room.
- Corridor
- A thin, small
hallway that is
usually windy.
- Hallway
- A room that is long
and stretched, used
to connect two or
more rooms together;
to act as a
connection.
Finally, for a map
legend, head over to the
appendix. If the maps
get confusing, don't
worry. Just try to read
them as best as you can.
I can barley read them,
either.
AND! (Man, I have a
lot of stuff to talk
about here.) There are
some levels where there
is a question where the
level designer's name
has a question mark by
it. This is because I am
not totally 100% sure
who made it. If you
know, feel free to tell
me.
3.1
Episode 1: Escape from
Wolfenstein
You stand over
the guard's body,
grabbing franticly for
his gun. You're not sure
if the other guards
heard his muffled
scream. Deep in the
belly of a Nazi dungeon,
you've only a knife, a
gun, and your wits to
aid your escape.
Just a few
weeks ago, you were on a
reconnaissance mission
of extreme importance.
You were to infiltrate
the Nazi fortress, and
find the plans for
Operation Eisenfaust.
Captured in your
attempt, you were taken
to their prison, and
awaited your execution.
Only you know where the
plans are kept, and the
Allies will face a great
defeat if you don't
escape! You must face
the horrors of the
prison keep known as
Wolfenstein.
So starts the first
of your adventures in
this great game, with
Episode 1: Escape from
Wolfenstein. As the
story above says, you're
trapped inside this
mammoth dungeon, and you
have to shoot your way
out. In this section,
I'll tell you how to
beat every level the
right way for Episode 1
(Ep1 for short).
Record time for this
episode is 5:20, set by
John Romero on the Bring
'em On Difficulty.
Note, no silver key
is required in Episode 1
to beat any of the
levels!
3.1.1
Level 1
DESIGNER:
Tom Hall?
Ok. Here it is. Your
starter level. The
beginning.
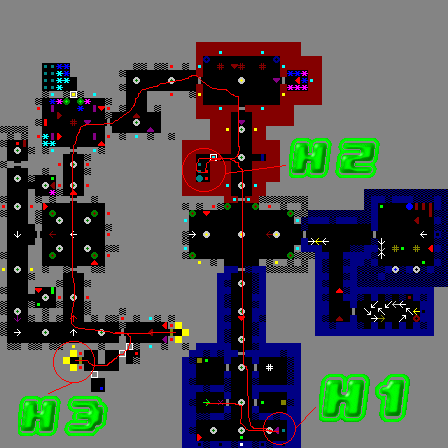
Notice the hot-spots.
The red line is the
direction you should go.
If this all looks a
little confusing, go to
the appendix for a map
legend.
HOT-SPOTS
- H1
- Don't forget to
kill the guard here
and grab the ammo.
You'll need it, since
you've only got 8
bullets to start
with.
- H2
- The secret room
here is very helpful,
with some ammo, first
aid kits, and the
Machine Gun!
- H3
- You can also access
the Episode's secret
floor from here (see
section 3.1.10). Just
open the secret
rooms, and
Voila!
WALKTHROUGH
Ok, you start in a
cell with a dead guard
lying there in front of
you. First, walk forward
and open the door to
leave you cell. Easy,
huh? There are a few
more cells there in a
hallway beside you, but
turn right for now. A
guard will be standing
there, so kill him.
Collect the ammo behind
him. You'll need it,
since you only have 8
bullets. Also collect
his ammo. Grab the
dinner if necessary, and
go back to the cell
hallway, and through the
door in front of you.
There should be another
hallway here, so go down
it and open the
door.
Now you'll be in a
large room, with a guard
or two waiting for you
there. Blow them away
and go into the
wooden-walled area.
Inside is another
hallway with two small
one branching off from
it. Kill the guard, and
turn down the left
mini-hallway. A guard
should be there, so
shoot him. But, don't
walk away. Walk up to
the Hitler portrait, and
push it. It should open
a secret room, with a
very helpful weapon, the
Machine Gun. Use it
often. Now, exit the
secret room, and go back
out of the room here the
opposite way you
came.
Here, you'll enter
another room, with some
guards. Kill them, and
you have an option
between the left or
right doors. Head left
for the rest of the
level, head right for
some treasure and
points.
Heading left, you
enter a small hallway.
Continue down it,
killing the guards and
going through the door.
In the next room you'll
see a couple of guards,
and also some treasure.
Pick it up for extra
points, and head out.
You'll see a small
hallway. Continue
through that and you'll
come to a large, square
room with two doors.
Head straight and you'll
go to Quite a large
hallway, that may have a
number of guards around.
Kill the guards you see,
but turn left at the
hallway. Enter the door,
and there's the
exit!
However, you can also
access the secret level.
When you first enter the
room, turn 90 degrees
right, and press the
wall right in front of
you. When you just enter
the secret room, also do
the same. You'll be
taken to the room with
the secret elevator.
Check the map for more
help. All walls with
white squares around
them are pushable.
3.1.2
Level 2
DESIGNER:
Tom Hall?
This standard-affairs
level has nothing
majorly special. Just
some first-appearances
by keys and the
Chaingun!
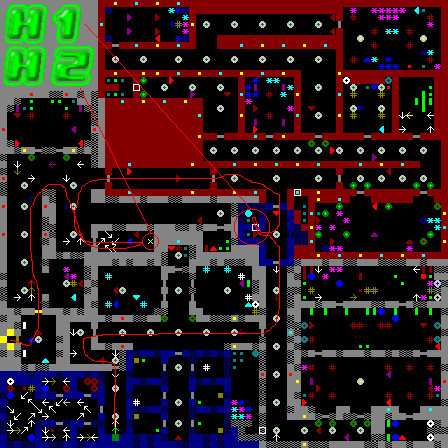
HOT-SPOTS
- H1
- In this secret lies
the treasured
Chaingun! A powerful
weapon indeed...
- H2
- This level requires
a key to exit, so
remember to get
it!
WALKTHROUGH
You enter this level
in a small hallway with
a door in front of you,
and to your left. Skip
the left, and go
forward. In the room, a
guard should be there
waiting for you, so blow
him away. Turn a corner
and go through the door.
You'll new enter a large
hallway. Keep running
straight to the door at
the end of the hallway,
and enter.
You'll be in another
hallway, with some
guards. Turn left, and
enter the door in the
blue-brick section. Here
is a small hallway, with
two others on the sides.
Down the left one is a
guard with some ammo.
Collect it, but don't
leave yet. the second
brick in that little
passageway is a secret!
Push it, and reveal the
prized Chaingun! You'll
grin with delight! This
gun comes in very handy
later.
Exit the secret room,
and leave the main room,
opposite the way you
came. You'll be set in a
hallway with two
directions to go, so
head left. You'll enter
another hallway. Keep
going forward, but once
you open the door, don't
move. This room is quite
large, and has a lot of
enemies in it. If you
haven't been wondering
throughout the level,
its also has the first
appearance of the SS
enemy. Always stay away
from close-rage fire
with these guys, they'll
wipe you out easy. This
is where the Chaingun
comes in handy. Mow down
all the enemies you see.
It shouldn't take too
long :-).
Turn right, past the
hallway to your left,
and you should see a
door. Open it, and
reveal an SS and Guard
that are both guarding
the Gold Key! Grab the
key, and head back out.
Remember, guards may
still sneak up on you,
so be prepared. In the
big room, go forward,
and turn the corner to
your left. Go down the
hall. You'll see a
little room-extension
there to your left, with
guards there, so shoot
them. Also, collect the
treasure. Go back to the
main hall, and enter the
locked door. Some guards
will be there, and the
level exit.
3.1.3
Level 3
DESIGNER:
Tom Hall?
Another standard
level, with nothing
major.
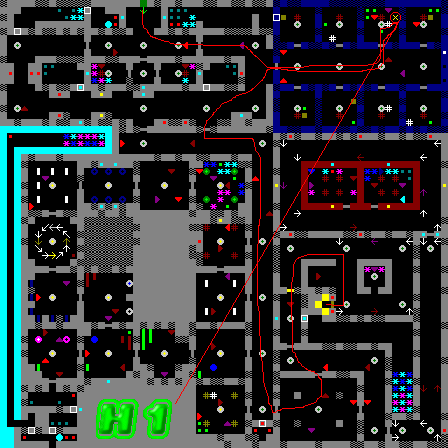
HOT-SPOTS
- H1
- Remember to grab
the key here to exit
the level.
WALKTHROUGH
You start in a room
that has two small
hallway on the side.
Turn the corner, and
head left, through the
door. This time, head
right, into the prison
area of the level.
You'll see a few guards
in the room, so kill
them. Open the third
door on the left in the
room, and you'll find
some stuff to collect,
including the Gold Key.
Grab the key and leave
the prison area.
Heading left down the
hall, enter the first
door to you left. You'll
be in another large
hallway. Kill the
guards, and go all the
way down to the end of
it. Take the last door
on your left. Inside is
a room with some guards,
so kill them, and enter
the door to your left.
You'll be in ANOTHER
hallway. Take the door
in front of you to your
left. You'll see a guard
and the locked door in
this room. Enter the
locked door, and take a
right around the corner.
There may be a few
guards in here, and some
may sneak up on you, so
be careful. You should
be able to find the
elevator from here.
3.1.4
Level 4
DESIGNER:
Tom Hall?
This has to be my
favorite level in Ep1,
and I don't know why.
There are a lot of
guards that can sneak up
on you here, so be
careful. The Chaingun
makes its first
appearance not in a
secret here, so be sure
and get it if you don't
already have it.
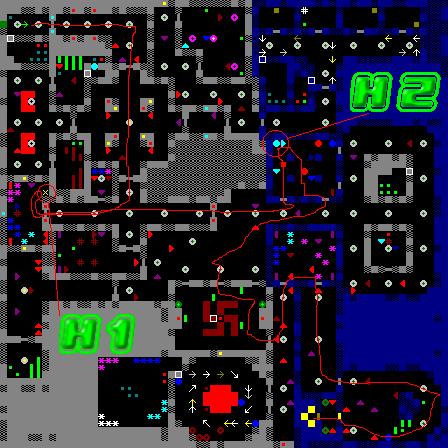
HOT-SPOTS
- H1
- The key lies here,
in a nicely guarded
room. The SS in here
may come after you,
so be careful.
- H2
- The Chaingun makes
its first non-secret
appearance here, so
be sure to pick up.
Its guarded by SS
though, so be
careful.
WALKTHROUGH
Alright. This level
is tough, and there are
plenty of guards in your
way. So, watch your ass
and be alert. I'm gonna
take you through it
step-by-step, and you'll
have to find out where
most of the guards are
on your own.
You'll start in a
small room. Exit the
room, and turn the
corner to the right.
You'll see some guards
and another door. Go
through the door and
you'll be in a large
"intersection" room.
Keep going straight and
head through the door.
You'll be in another
intersecting hallway
room. Turn left, and
through the door down
the hall. Inside is a
room with a number of
guards, and the gold
key. Grab the key and
leave the room.
Head straight down
the hallway and into the
door. Inside is a big
room. Now's where the
guards really start to
come, so be ready. Keep
going straight and into
the first door on your
right (a blue-brick
area). Some SS are in
this room, so be careful
Here's you'll find the
Chaingun! Remember to
grab it, and head back
out of the room.
Inside the large
room, head caddy-corner
to the right, to a gray
brick area. See the map
for more. Inside should
be a strangely-shaped
wood wall island (shaped
like a swastika from the
top). In this room, look
around for another door
that doesn't lead to the
big room.
In here is a big
hallway. Turn left, and
go through the door.
Inside this room is a
bunch of treasure, and
some guards. Kill the
guards and head into the
next door. You'll be
taken to another large
room. Go to the end of
it, and go through the
door. In here is your
last room, but run
directly straight,
behind the island in the
room. Go around it, and
you should see the
elevator.
3.1.5
Level 5
DESIGNER:
Tom Hall?
Another standard
level. Nothing
special.

HOT-SPOTS
- H1
- Don't forget to
pick up the key
here.
WALKTHROUGH
You'll start in a
small room. Go through
the door ahead of you.
Here will be a room with
a large red-brick island
in the middle of it. In
here are some guards, so
be careful. Head right,
and into the wood-wall
area. In this room, head
right, through the door.
You'll be in a small
room. Head through the
door you see, and into
another small room. Head
through that door, and
into another small room.
Go down the hall, and to
the right, going forward
through the door on the
right. Inside this room
is the key, and a few
guards.
Once you grab the
key, head all the way
back to the blue-brick
room with the red-brick
island in the middle. In
this room, head around
the island, through door
opposite of the wood
wall area. In here, head
down the hall, and turn
left. Head through that
door, and go around the
oil berrels. Head
through the door, and
turn right, heading to
the door in front of you
down the hall.
In this room, head
through the door, and
into another room with a
number of guards and the
locked door. Open the
locked door, and you'll
be in a room with a few
wood wall islands in the
middle of it, and the
elevator. Be careful in
this room. There are a
number of guards, and
they can hide well
behind the islands. Be
sure to kill ALL of
them, or you might be
dead, fast. Finally,
head to the
elevator.
3.1.6
Level 6
DESIGNER:
Tom Hall?
This level is rather
long, so get ready.
You'll mostly be in
red-brick areas.

HOT-SPOTS
- H1
- The key to exit the
level lies here.
WALKTHROUGH
Alright. You'll start
out in a room with a
wood-wall island in the
middle. There are a few
guards patrolling around
it, so be sure to kill
them. When you go
through the door, you'll
be in a very long room,
that we'll dub the I
room. Because, from
above, it looks slightly
like the letter "I".
Remember this room,
because you'll need to
get back here later. Ok,
when you first enter the
I room, turn right and
head down the hall and
into the door.
Inside this door
you'll see another hall.
Turn right, and head
down it. Keep walking
down this hall, and to
the second to last door.
You should be in another
small room, with a door
at the end of it. Go
through the door, to
enter yet another
hallway. Head straight
down it, and around the
corner to the left. You
should see a door. Enter
the door, and turn right
around the corner. Head
all the way down this
hall, and into the
wood-walled area.
Inside the
wood-walled area are a
number of dogs, and at
the end of the room is
the Gold Key. Grab the
key. Now, remember the I
room? Head all the way
back to it now.
Ok, once you get to
the I room, head
directly forward to the
other side of the room,
and into the door that's
offset in a small
corridor. In this room,
head all the way around
to the right, and enter
the door. There is the
elevator.
3.1.7
Level 7
DESIGNER:
Tom Hall
This level is one I
always thought would
make a good deathmatch
level if a multiplayer
Wolfenstein ever
existed. Why? Who
knows.

HOT-SPOTS
- H1
- Remember to pick up
the Gold Key
here.
WALKTHROUGH
Ok, from your
starting position, turn
directly 90 degrees
left, and around the
island you are right
next to. You should see
a opening to a hallway
here. Go in it, and
you'll see a locked and
unlocked door at
opposite ends of the
hall. Head down the
locked door, and through
this hallway. Inside
that door, you'll see
another hallway jetting
out right. Head down it,
and through the
door.
Inside this room,
head right, and around
the corner. Head into
the gray-brick room, and
inside collect the key.
Now, from here, head all
the way back to the hall
in your starting room
that had a door on both
ends of it. Enter the
locked door here, and
turn the corner in this
hallway. Head down the
hall, and into the
gray-brick area. There
you'll see the
elevator.
3.1.8
Level 8
DESIGNER:
Tom Hall?
The last level before
you try and escape
Castle Wolfenstein.

HOT-SPOTS
- H1
- Don't forget to
pick up the Gold Key
here.
WALKTHROUGH
In your starting
room, head directly
forward through the
door. Inside here, don't
move at all. Fire your
weapon. You should see a
guard alert in the
island behind you. Kill
it, and turn the corner
to the right. You should
see a guard in front of
you. Kill it, and turn
around and kill the
guard behind you.
Ok, head out the door
on the right side. In
this room, head down the
hall and around to the
door at the end of the
hall. Go in this door,
and inside you should
see a wood wall area.
Head into the first wood
wall area door you see.
Inside this room you
should see the key,
along with an SS or two.
Grab the key, and head
back out of the room.
turn right, and through
the door on the wall
next to where you came
in.
Head through this
small door, into the
next room, through that
door, into the next
room, and through that
door. Inside is a
hallway. Head through
the door with the two
gold swastika on it.
Head through the door in
that room, and through
the door in the next
room. Here, head into
the door on the right.
Head to the end of this
hall, through the locked
door, and into the
elevator.
3.1.9
Hans Grosse
DESIGNER:
Tom Hall?
Here it is. The level
with your big showdown
with Hans Grosse, the
head of Castle
Wolfenstein. Use all the
stops you can on
him.

HOT-SPOTS
- H1
- Hans Grosse. The
big man himself. The
blue-armored S.O.B.
behind Castle
Wolfenstein. Wipe him
out, just like you
did her sister,
Gretel.
- H2
- The Secret. All
boss levels have at
least one of them.
Your lifeline. The
thing you can go back
to to get health and
ammo.
- H3
- FREEDOM! You're
outta the hell of
Castle Wolfenstein,
and back into the
Allied
Underground!
WALKTHROUGH
Ok, this level is
short and sweet, but
still tough. You start
out in a small room. Go
through the door ahead
of you, and into the
large hall. This is
where you'll be fighting
Hans. Run past
everything to the end of
the room, and open the
door. There he is, Hans
Grosse!
Once you alert him,
run back into the big
hall. On one of the
walls, there is a
sash/banner spaced
sparingly. On the middle
golden banner on one of
the walls is a secret.
Push it in, and you'll
enter a large secret
room. This room is VERY
important. It contains
large amounts of health,
ammo, and a Chaingun. If
you die, be sure to come
back here to replenish
on ammo and the Chaingun
before attacking Grosse.
If you're all juiced up,
get ready to fight!
HANS
GROSSE
Ok, you're ready to
take on Hans. Notice the
large hall that is your
battlefield. There are
quite a few islands in
the room, that can be
used for your advantage.
Hide behind them to
protect yourself from
fire. One strategy is to
hide, shoot, then hide
again. Repeat as
necessary. Eventually,
this works. Another one
that has said to work
was to run right up next
to Grosse, and then
slowly back directly
away, keeping your aim
on Grosse, and firing
the entire time.
Remember your strafing
technique can also be
useful. Always move, all
the time. It makes any
boss/enemy harder to hit
you.
Once Hans is dead,
grab the Gold Key he
drops, and head back to
the room he came from.
You'll notice a locked
door there. Open it, and
run to freedom!
YEAH!
3.1.10
Secret Level
DESIGNER:
Tom Hall?
This level is kinda
long, so be ready.
You're mainly going to
be fighting in the gross
purple slime areas.
Remember this is a
secret level, so you
don't have to get out in
a hurry. Explore around
and find secrets, they
give for more
points.

HOT-SPOTS
- H1
- Grab the Gold Key
here
WALKTHROUGH
From you starting
room, head down the
hall, and to the left.
Head around the corner
to the left, down the
hall, turning right, and
through the door. NOTE
THIS ROOM. From here,
turn left around the
corner, and into the
door on that wall. In
here, head down the
hall, around the corner
to the right, and enter
the first door you see.
In here, head forward
and turn the corner
left. Enter the
blue-brick area.
Head to the end of
the blue-brick area, and
through the door at the
end of the hall. Turn
right around the corner
in this room, and left
around that corner. Head
down the hall through
the door. Turn right
around the corner, and
you should see the Gold
Key at the end of the
hall. Grab it. Now,
remember the room I told
you to note? Head all
the back to it.
Now, when you enter
the room, head straight
forward, and turn right
through the door. In
here, head right around
the corner. Head down
the hall, and to the
split in the path. Don't
head to the path that
has the wood walled area
down it. Head the other
way, to the left. Go
through the door at
here, and head all the
way down this hall to
the gray-brick area.
Head to the end of
the gray-brick area, and
into another hallway.
Head down it, and turn
right around the corner,
and into the red-brick
area. In here, head into
the locked doors. This
room will have two
elevator doors. When you
first enter the room, go
to the door on the left.
The door on the right is
full of SS.
3.2 Episode 2:
Operation:
Eisenfaust
You run out of
the castle and hook up
with the Underground.
They inform you that the
rumors were true: some
hideous human
experiments were seen
around Castle
Hollehammer. So
Operation Eisenfaust is
real!
You must
journey there and
terminate the maniacal
Dr. Schabbs before his
army marches against
humanity!
That would be the
basic intro to Episode
2: Operation:
Eisenfaust. A little
more in-depth, Dr.
Schabbs created a mutant
army made out of undead
soldiers. He took the
dead soldiers, and
resurrected them into
new, brainless zombies.
These new mutants are
ultra strong, and are
virtually limitless to
create. If this
operation goes through,
the world could be in
danger. Kill Schabbs and
the mutants, or be
killed.
In this episode, you,
of course, face the
mutants in battle. This
is also the only episode
where they appear.
3.2.1
Level 1
DESIGNER:
Tom Hall
This is the first
level where you have to
face the deadly mutants.
From here on out, BE ON
GUARD ALL THE TIME.
Those things are DEADLY.
I'm talking LETHAL
DEADLY. I mean KILL YOU
FASTER THEN YOU CAN SAY
"What was that?"
DEADLY.

HOT-SPOTS
- H1
- This room is vital
to your winning. Its
got some supplies,
and a Machine
Gun.
- H2
- You can find the
secret exit
here.
WALKTHROUGH
Alright, if I haven't
told you already,
mutants infest this
level, so be VERY alert.
Mutants can kill quick.
Ok, from your starting
room, head directly
forward through the
door. In this room, head
around the red-brick
island and through the
door in front of you.
This room contains some
VERY lifesaving
supplies. Grab the
Machine Gun and all
ammo. Head out of the
room.
Back in the big room,
head right from the
supply room. The room
splits up into three
other ways now. From
here, you can head left
and go to the secret
level, or head right and
beat this level. Heading
right, go around the
small island, turn right
and then forward at the
crossing, around the
island, down the twisty
hall, around the corner,
and into the room.
Beware of the mutants
here. If you've got the
pistol, run. If you've
got the Machine Gun,
you're okay. Then, head
into the elevator.
If you headed left at
the split, you'd go into
a room with two doors.
Beware the mutants.from
here, go to the back of
the room, on the right
wall. Push the wall up
and down until you find
a secret. There, you'll
be in a room with some
first aid and ammo. The
secret here is kinds
hard to explain, so keep
pushing all the walls or
look at the map until
you've found it. From
there, just enter the
elevator.
3.2.2
Level 2
DESIGNER:
Tom Hall?
This level goes back
to reality, and away
from the mutants more.
Nothing special.

HOT-SPOTS
- H1
- The Gold Key lies
here.
WALKTHROUGH
From your starting
room, head forward. Go
around the small steel
island, and through the
door down the corridor
into the wood wall area.
Now, here you have to
push a secret wall to
beat the rest of the
level. This level is one
of few that requires you
to push a secret wall to
continue. Anyway, push
the wall that has the
cross on it. From this
room, enter the
red-brick area.
In here, head through
the door straight in
front of you. In this
room, turn right, and
you'll see two doors. Go
to the one of the left.
Head through the door in
this room, turn all the
way around the corner to
the right and enter that
door, then pick up the
Gold Key. Now, head back
to the wood-wall
area.
When you first
re-enter, head through
the door on your left.
Head through the door in
front of you in the
room, and you'll enter a
blue-brick area, with
three different ways to
go. Go the way directly
ahead of you. In this
small room you'll see
three doors. Each one
leads to the same room,
so you can go through
any. Beware, though. SS
are waiting on the other
side. When you get out
of there, and head down
the hall, the hall will
branch off two ways. Go
the right way, for now.
Head down this hall, and
then to a small
corridor. Go down this
corridor, turning left,
and to a wood wall area
with a locked door. You
can enter the door, or
there is a secret nearby
with a first aid kit,
and a Chaingun you can
find.
Go through the locked
door, and into the
elevator.
3.2.3
Level 3
DESIGNER:
Tom Hall?
This level takes you
back into the blowles of
Schabbs' castle for a
little bit. Here is the
first appearance of the
Silver Key. Get used to
finding two keys from
now on, like it or
not.

HOT-SPOTS
- H1
- The Gold Key is in
this closet.
- H2
- The first Sliver
Key in the game is
protected by
mutants...be
careful
WALKTHROUGH
You start in the
middle of a long hallway
going two directions.
Turn right, and head
down the hall. Be
careful, an SS may sneak
up on you from behind.
Turn left around the
corner, down the hall,
left, and through the
door. In here is a room
with three different
doors to chose from.
Turn left and into that
door. In here, take the
RIGHT door, and in the
room, open the wood
closet and grab the Gold
Key.
Head back to the room
that has the three
different doors. Now
when you first enter,
head straight, through
the door. You should now
be in a room with three
locked doors. From here,
head through the right
door, down this hall
through its door, and
into a room with two
paths to take. Take the
right door. In this
room, head all the way
around the right corner
behind you, and into one
of the two doors. Here,
you'll find a room with
the Silver Key at the
end, and eight small
corridors. If you're on
Bring 'em On mode, the
first, second, and last
pair of corridors should
have mutants at the end
of them. If Death
Incarnate, then all
corridors should have
them.
To evade the mutants,
walk very slowly towards
the Silver Key, just so
that the mutants can see
you in the corridors,
then back up, and wait
for them to come out.
After you've killed all
the mutants, grab the
Silver Key, and head
back to the room with
the three locked doors.
When you enter the room,
head right through the
Silver Key door, through
this room, and into the
elevator.
3.2.4
Level 4
DESIGNER:
Tom Hall?
Hmm...this level is
nothing major.

HOT-SPOTS
- H1
- The Gold Key lies
here.
- H2
- Remember to get
that Silver Key
here.
- H3
- In here you can get
some food and a
Chaingun!
WALKTHROUGH
There may be some
mutants sneak up on you
in this level, so be
extra careful. From your
starting position, head
directly forward, and
through the small, long
corridor to a room that
has two paths you can go
down. Really, the room
is circle shaped, so go
around the island in the
middle one way, and grab
the Gold Key. Head back
the go through the
corridor.
At the end of it,
head left around the
corner, and to an area
with a number of doors
to choose from. If
you're facing the corner
of the area, go into one
of the farthest two
doors on the left set of
doors. Head down this
small hallway, and into
a large room, with the
Silver Key at the end of
it. Be VERY careful
here, because the
instant you make a
sound, there will be
mutants come from all
the side rooms, a lot of
mutants. If you want,
take the middle door on
the left side of the
room, and in this room
you can find a secret
wall that leads you to
the Chaingun, but if
you're in a hurry or
don't want risks, just
grab the Silver Key and
leave. Head back to your
starting position.
From your starting
position again, head
left and to another
group of doors. This
time, head to the
farthest one on the
right set of doors. Head
down the corridor, into
the locked door, down
the hallway, into the
other locked door, turn
left here, and head into
the elevator.
3.2.5
Level 5
DESIGNER:
Tom Hall?
I like to call this
level "The Swastika of
Doom", for obvious
reasons. The whole level
is shaped like one!
Yeah, you know it, id
Software had to pull
that off somewhere.

HOT-SPOTS
- H1
- Get the Silver Key
here, first.
- H2
- This room has the
Chaingun out in the
open - get it.
- H3
- Get the Gold Key
here, then head for
the exit.
WALKTHROUGH
Ok, there are four
wings to this level, for
the four wings of a
swastika. You'll have to
go to all of them, so
get ready.
The first wing of the
level you're in has
nothing in it, so in the
hall you are in, head
down it, turn left, and
head all the way to the
end, and enter the door.
You'll be in a small
room with three doors,
plus yours, that lead to
the different wings. One
is locked. Enter the
red-brick wing. Inside
here, you can either
head into the first door
on your right, or go to
the end of the hall. If
you head in the right
door, you'll be taken to
a room with the Chaingun
lying there, and alot of
ammo. But, be careful, a
number of SS guards are
hiding behind the steel
islands. If you're fast,
you may go
unnoticed.
If you chose to not
go into the right door,
head down the hall, and
turn right. Head all the
way down this hall, and
enter the last door. Go
in here, and you should
find the Silver Key,
guarded by mutants. Grab
the key, and head back
to the room that
accesses the other
wings.
This time, head into
the blue-brick wing. In
this wing, head down the
hall, turn right, down
this hall, and go to the
last four doors. The
last two of these doors
goes to a room with some
SS. The first two head
into a long room with
the Gold Key there. Once
you get the key, go all
the way back to the wing
that has the locked
door.
In this wing, head
down the hall, around
the corner, and go into
the second-to-last door.
In here, open the locked
door, turn right, and
head into the
elevator.
3.2.6
Level 6
DESIGNER:
Tom Hall?
Kind of a mazy level.
Be careful, sometimes
things can sneak up on
you. No Silver Key
required to exit.
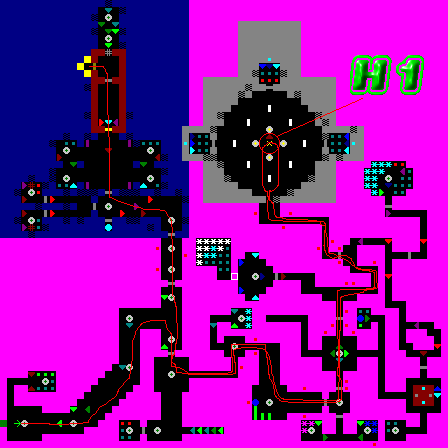
HOT-SPOTS
- H1
- Get the Gold Key
here.
WALKTHROUGH
From your starting
position, head forward,
and down the hall as it
turns slightly. At the
end of this room, you
will be taken to a split
in the path. Remember
this split, and take the
door on the right. In
this room, head into the
corridor your left. Go
down it, into the small
junction, head right
there, to the end of the
room, and through the
door. In this small
room, take the door to
the left. In here, kill
the mutants and go
through the door in
front of you. Head right
down the corridor, and
into the first door you
see. Once you open this
door, DO NOT SHOOT YOUR
WEAPON. Head down the
corridor, and into the
gray brick room. In the
center of the room is
the Gold Key. Now,
remember the split I
told you to remember? Go
back to it.
When you first enter
the room with the split,
go through the door in
front of you (or to the
left of you, if you're
thinking the first time
you saw the split).
Leave this small
hallway, and go into the
blue-brick area. Turn
the corner and you
should see three doors.
Take the door on the
right wall. This room
might be tricky due to
hiding enemies, so be
careful. Head through
the locked door you see,
down the hall, open the
door, and go into the
elevator.
3.2.7
Level 7
DESIGNER:
Tom Hall?
This is perhaps the
strangest level in the
entire game. id Software
made it so you can beat
the entire level in
seconds flat. The
majority of the level
lies in a secret.
Strange, stuff.
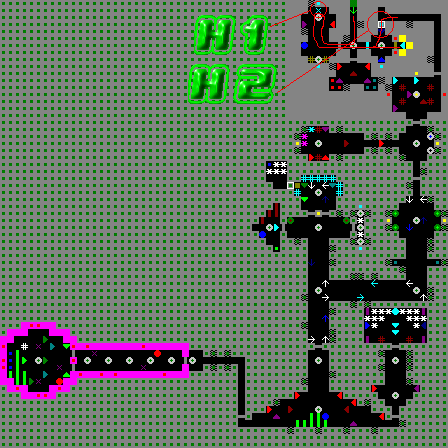
HOT-SPOTS
- H1
- Grab the Silver Key
here.
- H2
- If you want to
explore the rest of
the level, head into
this secret.
WALKTHROUGH
Walkthrough? Heh,
walking through this is
almost a joke. But if I
must... From your
starting room, go right
into that room, and grab
the silver key. Then
head back to your
starting room, and enter
the locked door. Ta da,
the elevator.
If you want, you can
turn left in the last
room and push the eagle
statue. This takes you
to the rest of the
level.
3.2.8
Level 8
DESIGNER:
Tom Hall?
What makes this level
so special? Why, the
infamous Aardwolf Maze,
home of the "Call Apogee
Say Aardwolf" sign. (see
section 2.8.2)

HOT-SPOTS
- H1
- Get the Silver Key
here before going
after the Gold
Key.
- H2
- Get the Gold Key
here.
- H3
- If you dare enter
the Aardwolf Maze,
good luck getting
through it.
WALKTHROUGH
From you starting
position, you should the
entrance to a
wooden-walled area
directly in front of
you. Don't go to it, but
turn 90 degrees left,
and down the hall that
way. You should T into
another hall. Turn right
at it, and into one of
the last two doors. In
this small room, take
the middle or left doors
you are facing. At the
end of this hall should
be two locked doors.
Don't go in them, but
head to the last
unlocked door, and grab
the Silver Key here.
Now head all the way
back to the
wooden-walled area you
first saw when you
entered the level. When
you first get into it,
head directly into the
locked door, into the
two doors on the left,
and grab the Gold Key.
But be very careful in
this room, SS may sneak
up on you. Now head out
of the entire
wooden-walled area.
When you first exit
it, head left around the
island and down the
hall. When you get to
the place with the bowls
lying around, you can
either turn right, and
push the wall behind the
second bowl, or continue
down the hall. If you
chose to push the wall,
you'll be in a secret
area. From there, push
one of the walls in one
of the corners, and then
push the wall to the
right there. Then,
you'll be in a slightly
larger room, and at the
end are two signs. Push
around on the end wall,
and you'll then enter
the Aardwolf Maze. (Use
the map to help with
finding secrets.) This
is an EXTREMELY nasty
maze that takes a long
time to beat. IF you are
lucky enough to avoid
the Hans Grosse's, and
get through the maze
right, you'll see the
great "Call Apogee Say
Aardwolf Sign". Note
that as a total teaser I
have not traced the
route through the maze.
Beat it yourself and use
the map if you're
chicken! ;-P
If you chose not to
go through the maze,
continue down the hall,
and enter the locked
door. Then enter the
elevator.
3.2.9
Dr. Schabbs
DESIGNER:
Tom Hall?
Finally, the moment
we've all been waiting
for...the final showdown
with the Schabbsster.
Take this guy out, or
the world will fall at
the hands of the
Nazi's!

HOT-SPOTS
- H1
- Enter this secret
for your refills on
health.
- H2
- This secret has
what you need to take
out Schabbs.
- H3
- Dr. Schabbs. Whet
else is there to say.
Beat him to win the
episode.
WALKTHROUGH
Ok, from your
starting position, head
through the door in
front of you in this
room. You'll enter a
large room, with a large
island in the middle of
it. From here you can go
a few ways:
You have two secrets
that you need to open
that seriously help you
with health and ammo.
Turn right and go into
that corner, and open
that secret to get
health. Turn left, and
open the secret in that
corner to get ammo, and
a Chaingun if you
haven't already got one.
Now, head around the
island, and through the
door with the warning
signs next to it. Here,
you'll enter Schabbs'
room. Be very careful of
the mutants in the room,
though. They are deadly,
and can really sneak up
on you. Enter the room
with caution. When you
kill the mutants, run to
the back of the room,
and Schabbs will see
you.
DR.
SCHABBS
Killing Schabbs is
relatively easy. He is
the toughest boss, but
to beat him, you have to
constantly fire at him,
and strafe out of the
way of his saringes he
throws. When you need
ammo and health,
remember to head back to
your secrets. You can
also use the tiny
islands in Schabbs' room
to your advantage, by
hiding behind them to
avoid his fire. Just
remember all of your
tricks, and you should
be able to take out the
mother.
3.2.10
Secret Level
DESIGNER:
Tom Hall?
Here is yet again
another level that is
very easy to beat, and
has most of the level
contained in secrets.
Just be very aware of
the mutants, they are
everywhere.
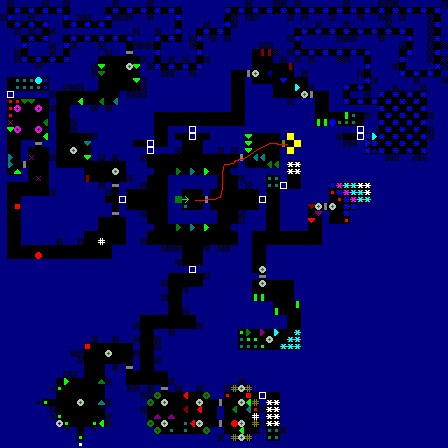
HOT-SPOTS
WALKTHROUGH
Exit your starting
room. From here you can
do two things. Explore
most of the level
through the secret
doors, (use map to find
them) or turn a little
to the right, and enter
the door you see. Be
careful of the mutants
in the big room and in
the smaller room you go
into. If you enter the
door, then simply head
into the elevator.
3.3
Episode 3: Die, Fuhrer,
DIE!
You stand over
Schabbs' fat, evil,
swollen putrid body,
glad your mission is
finally over. All his
journals and equipment
will be destroyed.
Humanity is safe from
his hordes of hideous
mutants.
Yet the Nazi
atrocities continue:
thousands march into
death camps even as the
Nazi war machine
falls to its knees.
There is only one way to
stop the madness. . . .
Hitler hides
in his titanic bunker as
the Third Reich crumbles
around him. It is your
job to assassinate him,
ending his mad reign.
You find he has escaped
to the Reichstag, and
there you must confront
him.
As the story goes,
you must invade Hitler's
bunker, and kill
him.
This episode, a new
guard type appears, the
Officers. Also, the
secret elevator is on
floor 7 this time.
3.3.1
Level 1
DESIGNER:
Tom Hall?
This level is short
and sweet. It does have
the first appearance of
the Officer, though. If
you notice, levels in
this episode are a
little more formal and
fancy than previously.
Well, Hitler is here!
Its not gonna be a
frickin prison!

HOT-SPOTS
- H1
- Grab the Gold Key
here.
WALKTHROUGH
Exit your starting
room. Head forward into
the hall in front of
you. It should turn
right, and hit a door.
Enter the door, and
you'll be in a room with
a wood-wall island in
the middle. Head forward
around this island, and
into the door ahead of
you. In this room, turn
left, kill the guards,
and grab the Gold Key.
Leave the room, and head
into the locked door in
the main room. Meet your
first officer here.
After you figure out
what he's all about, go
around the island, and
into the elevator behind
it. Ta, da.
3.3.2
Level 2
DESIGNER:
John Romero
This level has
nothing special. Just
get in there, kick ass,
chew bubble gum, and
realize you're all outta
gum cause the stuff
wasn't even around in
the 1940s.
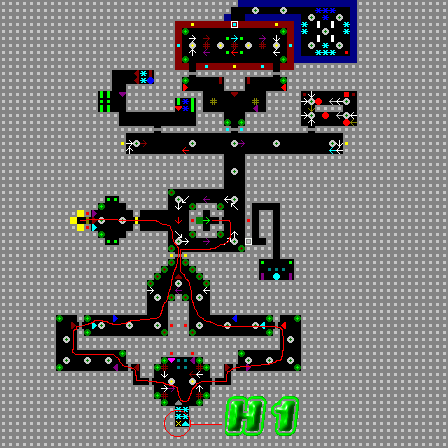
HOT-SPOTS
- H1
- Grab the Gold Key
here.
WALKTHROUGH
Leave your tiny
starting room. You'll be
in a room with multiple
paths to take (REMEMBER
THIS ROOM), but for now,
turn all the way right
and around the island
you're at, into the door
with the pictures of
Hitler around it. In
here you can go two
ways, and either is
fine, it goes the same
place, but let's take
the left path. Turn down
that hallway, go through
the door, around the
corner right, through
the door into the small
corridor room, and
through the door at the
end of it. In this room
will be a few guards,
and the Gold Key. Grab
the key, and head back
to room I told you to
remember.
When you first enter
the room this time, head
left around the bend and
into the locked door.
Then, to the
elevator.
3.3.3
Level 3
DESIGNER:
John Romero?
Just another level.
Geez, you know the deal
here. I shouldn't even
be saying these comments
on 70% of these
levels.

HOT-SPOTS
- H1
- You should already
know what this
is.
- H2
- Read above.
WALKTHROUGH
Ok, if you can even
make sense of the
cluttered first part of
the map, you're already
doing good. In your
starting room you'll be
faced with three doors.
Take the right door for
now. Go down this bendy
hallway and into another
room. (Yeah, yeah,
settle down.) In here,
turn all the way around
the corner behind you to
the right. Walk down
this room, into the main
section, grab the Gold
Key, and head back to
your starting room.
This time, from your
starting position, take
the center door. Go
through this small hall,
and into the blue-brick
area. From here, you'll
see a largish room with
a large wooden-wall
island room in the
middle of it. Follow the
island's walls around
until you find a door.
Enter the door, and then
go into the small
hallway. From there,
open the door at the end
of it, kill of the
guards here, and grab
the Silver Key. Leave
the island now, and
enter the locked door
you should have seen in
the blue-bricked area.
Go through the other
locked door here, and
then into the
elevator.
3.3.4
Level 4
DESIGNER:
John Romero?
No comment due to
lack of something to
say...

HOT-SPOTS
- H1
- Gold Key here.
Yadda, yadda,
yadda.
- H2
- Silver Key
here.
- H3
- This is one of the
rare times in the
game where you have
to open a secret to
beat the rest of the
level.
WALKTHROUGH
In your starting room
you'll be faced with two
doors. Take the door on
the right. Inside you'll
be in a twisty hall,
with a door to the left
of you. Enter that door
and you'll be in another
hall-type thing. Take
the path to the right of
you that you see when
you walk down it a ways,
and go through the door
at the end of it. Grab
the Gold Key in this
room and leave it. Go
back into the hall, turn
right, and enter the
locked door. Grab the
Silver Key here. Now
head back to the twisty
hall.
Head left here down
the twisty hall and
through the door on the
left. You'll be in a
room with a wood-wall
island in the middle.
When you first enter
this room, walk along
the wall to the door on
the right, and go
through it. Go down this
hall, and around the
bend. you'll be faced
with a two-way split.
Take either way, they
both just go around an
island and to a locked
door. Enter the locked
door. In here will
be...nothing. HA!
Gotcha. Push the wall at
the end of it to reveal
a secret. You can go
either right or left
here, it doesn't matter.
They each go around an
island, and to a couple
of SSs and the
elevator.
3.3.5
Level 5
DESIGNER:
Tom Hall?
Ok, ok. Here we go
again.

HOT-SPOTS
WALKTHROUGH
You'll start in a
tiny corridor. Go left
out of it, down a small
hall into a larger room
with columns and such.
Be careful when you
enter it, there'll be a
guard that sneaks up
behind you. In this
room, take the farthest
door on the right side
of the room. Or, if it
makes it any easier, the
door to the right of the
locked door. When you
winter it, you'll be in
a room with a large red
brick island in the
middle of it. Go into
the small corridor in
the island with the two
swastika sashes next to
it. In the room you
enter, you'll be faced
with many doors. Go
through the door with
the lamp and swastika
next to it. Keep walking
through, and around the
corner to the right. Go
through the door here,
through this room, and
to the Gold Key. Once
you pick it up, head
back to the room with
the bunch of doors. When
you first enter the room
this time around, enter
the middle door on the
right wall to leave the
island.
Go back out of this
large room, and into the
room with the columns.
Enter the locked doors,
and then head into the
elevator.
3.3.6
Level 6
DESIGNER:
Tom Hall?
This level actually
has a shortcut that can
cut time dramatically if
you take it. It uses
secrets, so I won't
hot-spot any of the
secrets you have to
enter.
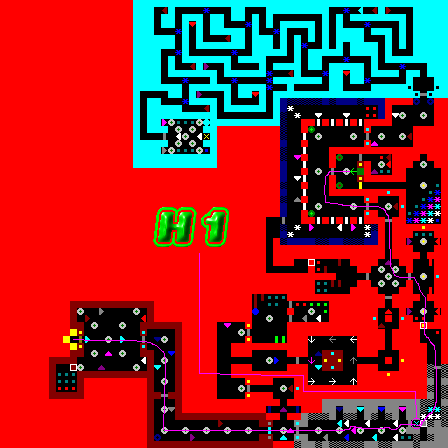
HOT-SPOTS
- H1
- Only one key
required to beat
here. The Silver
one.
WALKTHROUGH
Go directly forward
here, through the door,
and turn left, around
the corner, and through
the door there. Take the
door to the right in
this tiny room, down the
corridor, and into the
door on the left. Turn
right in here, and push
the wall with the
swastike on it. Go
through the door here,
grab the treasure, and
on the back wall there
is a secret. Once you
have found it, you'll se
the Silver Key and a
door. If you're playing
on Death Incarnate here,
GET READY. Once you
enter the room, it'll be
hell. Anyway, go through
the door at the end of
this hallway, and then
through the locked door.
Go down this hall, turn
right, through the door,
left through another
door, and then into a
big room and the
elevator.
3.3.7
Level 7
DESIGNER:
Tom Hall
This level, is,
rather...strange. There
is a large maze inside
of it, and a weird
question mark shaped
area, too. Its actually
quite simple to beat,
(one way) despite the
tons of paths I have
laid out below. It also
has the elevator to the
secret level in it.
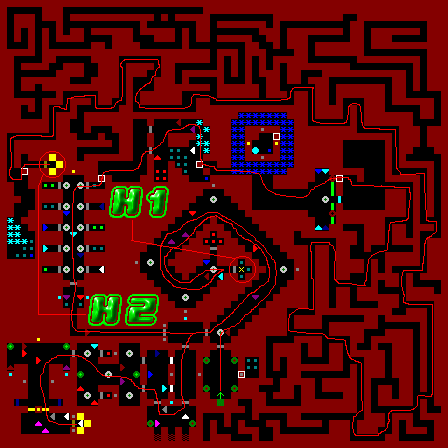
HOT-SPOTS
- H1
- Gold Key is here,
at the end of the
spiraling
hallway.
- H2
- The secret elevator
lies here. It takes
you to the pac-man
secret level. See
section 3.3.10 for
that.
WALKTHROUGH
Ok, get ready. Walk
through the door in your
starting room. You'll
now be in a spiraling
hallway. Ignore the door
to your left, and go
down the hall, around
each bend to a two-door
split. Take the right
door, grab the key, and
then head back around
the hall. This time,
take the door ahead of
you at the end, because
the left door takes you
back to your starting
room.
Ok, in this room, you
can take two ways. The
door to the left, and
the door ahead of you.
If you want to go to the
secret level, take the
door ahead of you. If
you want to beat this
level and continue, take
the left door.
Taking the left door,
run to the door ahead of
you there, since some SS
can see you through the
columns. Mow down the
guards in this room, and
turn into the other door
here, and fight the SS.
Then take any of the two
doors here, go through
this room to the end of
it and through the door,
around the corner to the
left in this room,
through the locked
doors, and then into the
elevator.
If you decided to go
to the secret level,
first head through the
long corridor, turning
right. Open the door
here, and mow down the
SS. In this room, (the
one with tons of doors)
head through the very
last door on the right.
At the back of this tiny
room, there is a
pushwall somewhere. Find
it, and go to another,
bigger room with two
doors. Take any door.
Now, explaining where
the pushwall is for this
room is rather hard, so
please use the map.
(Don't forget to pick up
the 1up here, too.) Once
you've found out how to
open the secret and
enter the room, head
through the big pile of
treasure (grab it if you
want) and into the side
room with the oil
berrels. Oh, no. You
can't open the door with
the Gold Key, and the
Silver Key is missing!
No fear. Just push the
wall behind the small,
brown, bowl or basket on
the left. (In reality a
toilet.) From here on,
its a large maze.
Explaining the rest
would take too much
time, and I'm too lazy
to do it, so you'll just
have to use the map.
:-P
3.3.8
Level 8
DESIGNER:
Tom Hall
This is a pretty hard
level, so get ready.

HOT-SPOTS
- H1
- Silver Key
here.
- H2
- Gold Key here.
- H3
- I usually don't
note a whole room,
but I thought I
should here. Once you
enter this room, its
gonna be hell on
Earth. Be extra
cautious here, and
use your health/ammo
wisely.
WALKTHROUGH
Ok, get ready. The
last level before Hitler
isn't going to be any
easy deal. You'll notice
in your starting room
that there is no door.
Well, if you've got any
sense at all you'll be
able to tell that you
have to open a secret to
continue. The secret is
easy to find here, just
push the wall in the
middle of the two
columns. From here,
you'll be taken to a
large swastika-shaped
room. Turn right and go
down that wing of the
room. Turn right around
the corner, and mow down
the guards. Be very
careful, though, since
there are that many
guards in all other
wings of the room, too.
Enter the door to the
right of you. In this
room, go straight ahead,
and to the right,
collecting the silver
key. Head back out of
this room, back through
the wing of the swastike
room, and turn left at
the intersection. You'll
notice a door to the
right here. If you need
ammo, get it in there.
If you die, go to that
room FIRST to get enough
ammo. Continue down the
wing, and into the door
to the right at the end
of it.
Here will be a room
with two small wood
islands. Just go
straight forward into a
small room, then left
into another room, then
through another door.
Here you'll be in a room
with many small steel
wall islands and oil
berrels. This is kind of
a mazey thing, so use
the map to help get you
through, or figure out
the route yourself. If
you get through it,
you'll be faced with two
doors. You can go
through either. Be
careful here, there are
a few guards waiting for
you behind the door.
Turn right when you
first enter this room,
and head through the
door. You'll be faced
with a room with many
doors. I'm too lazy to
explain exactly which
door to go into to get
the Gold Key, but use
the map for help.
Once you get the Gold
Key, head back into the
room you entered before
you entered the hall
with the doors. Head to
the other end of the
room here, and open the
door. Go through the
corridor, and open one
of the locked doors. Any
of them. In this room,
get ready. There are
quite a few guards in
here, and they CAN sneak
up on you, so be SURE
you've killed them all
before you continue. Use
the red brick islands to
your advantage here, and
collect ammo and health
ONLY when you NEED it.
Once you kill them all,
head through the two
unlocked doors, and into
this barrel-maze type
thing. At the end of it,
open the locked door,
fire one shot into the
room, and as fast as you
can go back through the
maze, into the big room,
and in front of the two
doors. This makes it
very easy, since all you
do is wait for them to
come to you.
Once you've killed
all the guards, head
back through the "maze",
into the locked room,
through another "maze",
and into the elevator.
Phew. Get ready for
Hitler!
3.3.9
Adolph Hitler
DESIGNER:
John
Romero?
Here it is. The final
(well, final in the
storyline anyway...)
battle of Wolfenstein.
You and Hitler. One on
one. Every man for
himself. Cage match. No
DQ. For the HEAVYWEIGHT
CHAMPIONSHIP OF THE
WOR...oh. Heh, sorry.
Got a little carried
away. ;-)

HOT-SPOTS
- H1
- Open the secret
here. It will be very
useful now or in the
future when you're
low on health and
have nowhere else to
go. But use it up
wisely.
- H2
- The Gold Key lies
here.
- H3
- The big man
himself. 'Nuff
said.
WALKTHROUGH
Ok. You'll start in a
room with the chaingun
and ammo in front of
you. I bet you've been
wondering where this
thing is through this
episode, right? Well,
its just been up here,
waiting for you. Yep,
this is the chaingun's
only appearance this
episode. Anyway, fill up
on ammo, grab the gun,
and go through the door.
You'll now be faced with
Hitler's Ghost, another
episode, and game,
first. Strafe out of the
way of the shower of
fire the thing shoots at
you. If you touch it, it
can be very deadly. Go
past the ghost after you
beat it and push the
wall with Hitler's
portrait in one of the
corners. In this secret
room, there are a nice
amount of backup
supplies. I wouldn't
collect them now, unless
you're really low. Wait
until you REALLY need
them in your fight with
Hitler later.
Leave the secret
room, and go through one
of the two doors
entering the wood wall
area. In here, go
straight through to the
two other doors there,
and open one. You'll be
in a longish room, with
a couple guards, and two
more ghosts. Turn left
and grab the key here
first, then go back
around to the locked
door. Now, get ready,
since this is it.
ADOLPH
HITLER
Ok, when you first
enter his room, run
directly forward,
hearing the stuff he
says on the way, and
turn around the corner
right, into a pool of
ammo and health. Kill
the officer here, and
load up. Then, go back
into the main room and
start fighting. Use the
steel wall islands to
your advantage here, and
hide behind them to
avoid fire. When Hitler
breaks his fire rounds,
use it as an advantage
and blast him.
Once his armor is
off, he'll be really
fast here, and you might
need more supplies. Go
back to your secret room
and load up. Hitty
shouldn't be too far
behind. Just use
strafing and be fast,
and he'll be dead soon.
Whoo-hoo!!!
 The
absolute incarnation of
evil, Adolf Hitler, lies
at your feet in a pool
of his own blood. His
wrinkled,
crimson-splattered
visage still strains, a
jagged-toothed rictus
trying to cry out.
Insane even in death.
Your lips pinched in
bitter victory, you kick
his head off his remains
and spit on his corpse. The
absolute incarnation of
evil, Adolf Hitler, lies
at your feet in a pool
of his own blood. His
wrinkled,
crimson-splattered
visage still strains, a
jagged-toothed rictus
trying to cry out.
Insane even in death.
Your lips pinched in
bitter victory, you kick
his head off his remains
and spit on his corpse.
Seig
heil...huh. Seig hell.
3.3.10
Pac-Man Secret
Level
DESIGNER:
Tom Hall?
This is one of my
favorite levels. This
special secret level is
a repro of a Pac-Man
level, complete with all
the ghosts. Beating it
is a sinch, but that's
not really the point in
this level. Its just for
fun.
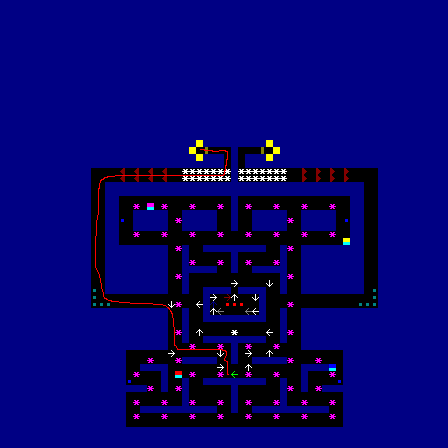
HOT-SPOTS
WALKTHROUGH
Heh. Look at the map,
or explore yourself.
Don't forget to avoid
touching the ghosts and
grab all the four extra
lives here.
3.4
Episode 4: A Dark
Secret
There was no official
in-game story of this
episode, so I'll tell
you a little about it
here.
Hitler has planned a
new war, dubbed the
Giftkrieg. Instead of
using normal
infantry/artillery, he
has planned using super
chemical weapons. These
weapons are many times
stronger than normal
bombs or explosives,
because they use certain
chemical ingredients. If
these weapons are
successfully used, and
the plan is executed,
the Allies could be
crippled and destroyed,
permanently.
The allies have
already found the
location of the research
and laboratories of
these weapons. You must
travel to that place,
and destroy any more
continuing research and
production. You must
also kill the scientist
behind the matter, Otto
Giftmatcher.
Good luck!
3.4.1
Level 1
DESIGNER:
Tom Hall
[Insert more
totally useless level
comments here.]

HOT-SPOTS
WALKTHROUGH
You'll start in a
large fancy room. Go
forward and around the
wall block at the end of
the room, and into one
of the double-doors. In
this room, there should
be an SS. Mow it down to
get a machine gun and
then leave the room.
Turn right when you
leave, and around the
steel wall block and
into the door behind
it.
Go into the red brick
corridor here. Use the
map to find your way
around here and get the
Gold Key. Once you get
it, leave the red brick
area, and this time go
across the path,
skipping the door and
going into the gray
brick side room there.
Then turn right, and go
into the cavelike
area.You need to follow
a wall the whole time to
get to the locked doors;
use the map for help.
Then enter the
elevator.
3.4.2
Level 2
DESIGNER:
Tom Hall?
This level is a
favorite for many
Wolfensteiners. A major
reason is its
super-secret room, with
a ton of goodies. Buts
its really hard to
find...
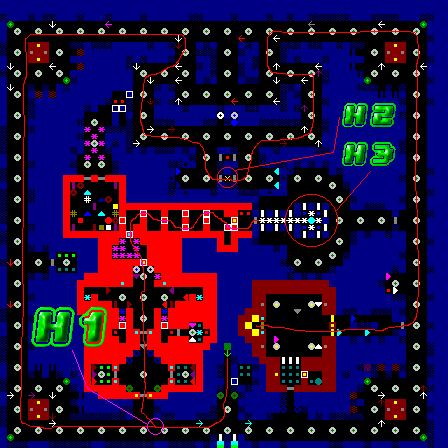
HOT-SPOTS
- H1
- You can go two ways
here. To the
super-secret room, or
you can just beat the
level, WITHOUT
getting four extra
lives, tons of
treasure, and a
Chaingun.
- H2
- Gold Key lies in
the small closet
here.
- H3
- Here is the secret
room of goodies.
WALKTHROUGH
When you first enter
the level, head forward.
Turn right here, and
start heading down the
hallway. When you get to
the red-brick area, you
can either go into it to
get to the secret room
of goodies, or you can
continue down the
hallway to beat the
level. If you picked to
beat the level, just
keep going down the
hall. Once you get to
the spot where the
hallway break off to the
side, and you can go in
that, do so. You can use
the map to find your way
through this part, and
get the Gold Key in the
closet. Beware the
SS.
Once you get the key,
head back to the main
hallway, and go right.
Continue down it, until
you reach the first door
to your right. Enter it,
go through the room,
then head into the
wood-wall room, and
through the
elevator.
If you decided to go
to the secret room, when
you first enter the
red-brick area, you'll
be in a room with three
doors. Head into the
door in front of you. In
here, just head straight
forward and push the
gold swastika on the
wall. Then you can use
the map to navigate
through the system of
secrets here to get to
the room. Be sure NOT to
push the wrong walls, or
you'll block the
way.
3.4.3
Level 3
DESIGNER:
Tom Hall?
And you thought I was
actually going to add a
comment here?

HOT-SPOTS
- H1
- Gold Key here.
- H2
- Open the secret
here to go to the
secret level.
WALKTHROUGH
In your starting
room, there will be a
wood wall island in the
middle of it. Turn right
from your starting point
and head around the
island to the first door
you see. REMEMBER THIS
ROOM. :-) Turn left
here, and through the
door on the left wall.
Go through the small
room here, to a
four-door tiny room.
Take the left door, then
turn right down the
corridor, turn right
again, through the
corridor to the first
door on the left you
see. Enter this small
room, get the key, and
then head all the way
back to the room I told
you to remember (the
second room). This time,
take the first door on
the left wall. Go down
the hall here, and turn
left to the locked door.
In this room, walk down
the hall until the room
gets bigger. Be careful
here, quite a number of
guards can come after
you. You should be able
to see the elevator from
here.
If you want to go to
the secret level, head
into the corridor
opposite the elevator
here, into the gray
brick space. Turn left
at the split, then left
at another, and finally
right and another. The
wall you are walking
towards when you make
your last turn has a
pushwall on it
somewhere. Push it, then
go through the door, and
into the elevator.
3.4.4
Level 4
DESIGNER:
Tom Hall?
*whistling*
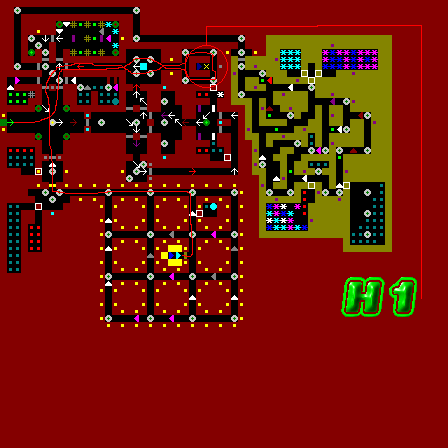
HOT-SPOTS
WALKTHROUGH
Your starting room is
shaped like a cross.
When you enter the
level, turn into the
left wing of the cross,
and through any of the
two doors. You'll be in
a square shaped room
with two doors on each
wall. Enter the door
farthest from you on the
right wall. Go through
the corridor, and around
the small steel block.
When you come to a
split, go either way, it
just loops around here.
Once you get to the
other side of the wood
wall island and grab the
key, head back to your
starting, cross-shaped
room.
Now when you enter,
go straight to the other
wing of the cross, into
the door. Turn left down
the corridor here, and
you'll run into a tricky
room with a number of
intersecting corridors.
Beware of the guards
here. If you can, just
run the whole time and
you shouldn't lose much
life. Anyway, turn at
the third corridor to
your right, then pass
another, and enter the
elevator. Beware the SS
inside of it.
3.4.5
Level 5
DESIGNER:
Tom Hall?
Rather big level
here. Get ready.
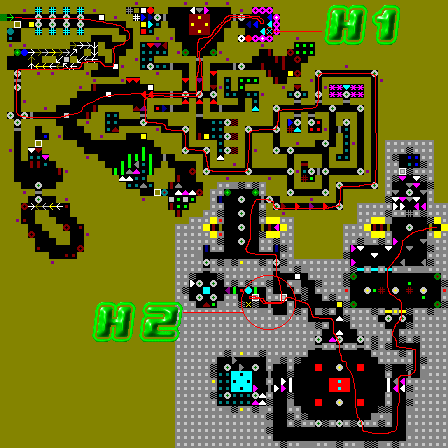
HOT-SPOTS
- H1
- Get the Silver Key
here. Be careful of
the SS protecting
it.
- H2
- Use the small
system of secrets
here to get the Gold
Key.
WALKTHROUGH
Ok, here we go. From
your starting room, go
straight forward. The
wall directly to you
right at your starting
point has a secret with
a machine gun in it
somewhere. Get it if you
need it. Anyway, go
straight forward,
turning right around the
corner. Go either way at
the small split. You'll
be faced with a bunch of
dogs here. Mow them
down, then go through
the rest of the room,
and into the door to
your right. Go down the
corridor here, and into
the door to your left at
the split. You should
then enter a hallway
type thing with two
paths. Take the left
path, away from the path
with the oil berrels
down it. Head forward
here, into the door
ahead of you, not to the
right of you. You'll
then be in a room with
six corridors going out
of it. Take the second
one on the left. Go
through the door here,
then right, next to the
island into the door. Be
careful in this room,
there are a number of SS
guarding the key.
Anyway, grab the key,
and head back to the
room with the separating
paths. (The one where I
said don't go to the
path where the oil
berrels are.)
When you enter the
room this time, turn
left, and head into the
door I said not to
before. Turn left at the
split, then follow the
corridor, and when it
splits, keep turning
left. When you see a
part of it with multiple
doors, take the second
one to your left here,
and follow this corridor
all the way around. When
you get to the end of
it, and you open the
door, you'll be in a
room with TWO elevators.
Ignore both. They're
just distractions. Turn
left at the end of this
room, and then look at
the map. When you enter
this room, there is a
wall you can push that's
right in front of you.
Once you find it, go
through the door to your
right, and then rush the
wall next to the barrel.
Grab the chaingun, Gold
Key, and first aid here.
Then leave the tiny
secret system, and find
your wall to the end of
the room, to the triple
doors. Enter any of the
three. Go around the red
brick islands here, and
into the outer hallway
in this room. Turn left
down it, kill the
guards, head to the end
of it, and open the door
at the right. Head
through the winding
corridor here, and into
the locked doors. Go
through this room into
the other locked doors,
then in this room, go
into the elevator at the
right. Whew.
3.4.6
Level 6
DESIGNER:
Tom Hall?
For some reason I
always consider this
level to be a
continuation of sorts of
level 4. Its kinda the
same thing...
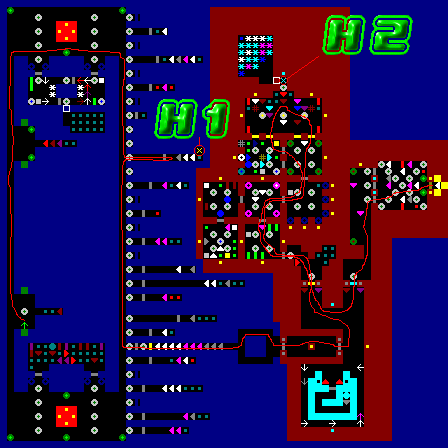
HOT-SPOTS
- H1
- Gold Key here.
- H2
- Silver Key
here.
WALKTHROUGH
From your starting
position, just go
straight into the
corridor in front of you
to your left a little
and walk down it.
Continue past the small
section to your left,
and then when you leave
the corridor into a
larger room, turn right,
across the room, to the
other side and down
another corridor with a
break every other wall
block. Use the map to
see which door you
should enter to find the
Gold Key, or just find
the right door yourself.
Once you grab the Gold
Key, continue down the
corridor again the same
direction you were
going, until you find
the door close to the
corridor, and a locked
door right behind it.
Behind the locked door
will be a variable wall
of guards, so blast them
away. Once you get
through them, go down
the short corridor. When
you get to the split, go
any direction, this is
just a small island.
When you enter the
wood wall area, finally,
and get through the room
with the tiny wall block
in it, turn left and
around a corner here. If
you went to the correct
locked door here, you
should enter it. Get
through the room here.
In the room you enter,
head into the right
door, then through that
little room, and through
the locked doors. Grab
the Gold Key in this
room, and head out of
it. Use the map to find
the room you head back
to. Once you get to this
room, turn left around
the corner here, into
the other locked door,
through the small
section in this room and
then through the
elevator.
BTW, that was the
worst level walkthrough
I've written so far. If
they keep getting worse,
please stop reading.
Thank you.
3.4.7
Level 7
DESIGNER:
Tom Hall
Yadda, yadda,
yadda.
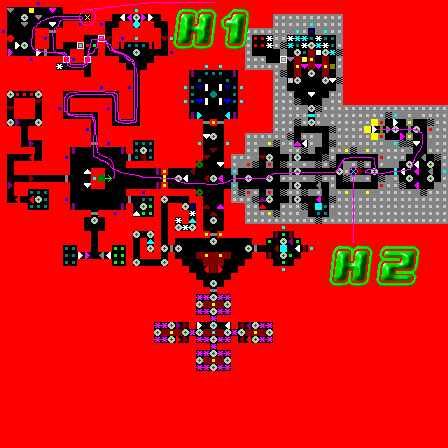
HOT-SPOTS
WALKTHROUGH
When you enter the
level you'll be in a
room, with a locked door
in front of you.
Remember this room. Turn
left here, around the
corner, into the door on
the left wall in this
room. Go through the
corridor here, into the
larger part of the room.
Go left and into the
corridor, and push the
eagle banner on the
wall. In this secret
room, DO NOT push the
other eagle banner. Look
around and find another
secret wall here, and
then another in this
secret. Go through any
of the two doors here,
mow down the officers,
and grab the Gold Key
(GK). If you want, when
you leave the secrets,
back in the small room,
there is a Chaingun in
there, so get it if you
need it. Then go back to
the room I told you to
remember, and into the
locked door here.
Go through this room
(beware the guards) and
into the gray stone
area. You'll then be
faced with a number of
paths here, so pick the
one directly in front of
you, to the left a tad.
Go down this corridor,
any way at the split,
and turn around at the
end of it to get the
Silver Key (SK). Then go
through the locked door,
around the corner to the
left, into the door, and
then into the
elevator.
3.4.8
Level 8
DESIGNER:
Tom Hall?
This level is also
kinda longish. There are
a lot of lines on the
map here, so good luck
trying to distinguish
them.
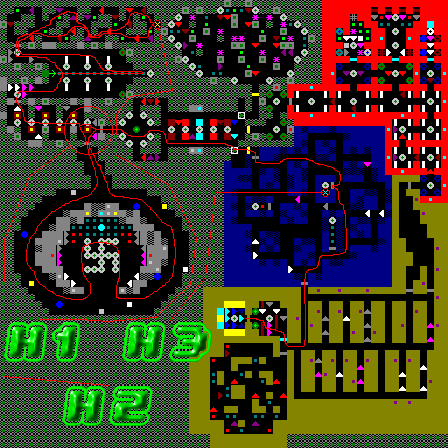
HOT-SPOTS
- H1
- GK
- H2
- There is a split
here. You can go
straight to complete
the level, or if you
want you can side
track and get a
Chaingun and a load
of supplies.
- H3
- SK
WALKTHROUGH
When you first start,
there will be a number
of officers in the room
where you are, so I
recommend going straight
forward and grabbing all
the ammo in the line,
then shooting when
you're in the corner
here. Once all the
guards are dead, head to
the right and into the
door here. There will be
a system of winding
paths here that are
essentially the same
room, but go through
them to the end of them
and grab the GK. There
are also a number of
guards here, so be
ready. Once you get the
GK, head back to your
starting room. Head
around to the other side
of the room here, and
into the door here. Go
through this small and
winding hallway. At the
end of it will be two
doors. Take the door
ahead of you to complete
the level. Take the door
to the right of you to
enter a strangely shaped
room, with a Chaingun
and lots of supplies in
it.
If you decided to
complete the level, just
go through the corridor
here, then along the
right wall (look at the
map if these directions
seem crazy. If you
haven't noticed, I've
depended alot on the map
in this episode). At the
end of this wall is a
secret. Find it, push
it, and go through the
locked door. Then go
through the unlocked
door. Turn left here.
When you come to a
split, turn left, then
look at the map to find
were the door to the
room with the SK is.
Then use the map to find
your way out of the
blue-brick area.
Once you get through
it, head directly
forward and when you
come to the second
corridor, turn right,
then into the locked
door, then into the
elevator. BEWARE the SS
in the elevator.
3.4.9
Otto Giftmatcher
DESIGNER:
Tom Hall
Welps, here he is.
The scientist behind the
creation of the chemical
weaponry.

HOT-SPOTS
- H1
- Sure, you could
risk your life and
grab the keys next to
the guard there...or
you could play it
safe and get the keys
in this secret
room.
- H2
- The man himself,
Otto Giftmatcher.
He's got a rocket
launcher, so remember
to avoid the rockets
by strafing!
WALKTHROUGH
In your starting room
are two doors on either
end of the room. Take
the door on the right
here. Then go through
this room right into the
door ahead of you. In
this room, it is vital
that you DON'T shoot
your gun. You'll notice
that there will be a
guard standing next to
two keys, with two doors
next to him. Don't even
try to get the keys. A
motherload of guards
will run out of the room
behind the doors.
Instead, look for a
secret on one of the
walls here. Use the map
to see exactly where. In
that secret contains two
other keys. Grab them,
then head back out of
this room the way you
came in. When you enter
this room, turn right
here, down the hall, and
into the door on your
right. Walk forward, and
into Otto's line of
sight.
OTTO
GIFTMATCHER
Ok. You'll notice in
his room, there are two
locked doors. The blue
brick one has ammo and a
Chaingun, and the red
brick one has health. Go
full up here, and then
face the guy.
He shoots rockets, so
you can strafe out of
the way here. Also use
the wood wall islands to
your advantage, using
the hide and shoot
method if you wish. Just
use your strafing and
mow the S.O.B. down.
3.4.10
Secret Level
DESIGNER:
Tom Hall?
This secret level is
totally bizarre. I think
id was drunk when they
made it. Its basically a
huge trap. You have to
follow a certain path,
and you can make it out
untouched. But if you
happen to mess up, there
is also a secret room
with ammo in it.

HOT-SPOTS
- H1
- Go into the secret
here, if you want to
get ammo.
WALKTHROUGH
Just use the map to
find the path outta
here, and RUN.
3.5
Episode 5: Trail of the
Madman
The twisted
scientist behind the
chemical war lies at
your feet, but the
fruits of his labor grow
elsewhere! The first
wave of chemical war is
already underway. In the
heavily guarded fortress
of Erlangen are the
plans for the upcoming
Giftkrieg (or Poison
War). Find them and
you'll know where to
find General
Fettgesicht, leader of
the deadly assault.
Well, as the story
goes, you have to head
over to Erlangen and
find the plans!
3.5.1
Level 1
DESIGNER:
John
Romero?
Do I really have to
comment here?

HOT-SPOTS
WALKTHROUGH
You start, as always,
from your starting room.
Go through the door in
front of you. Mow down
the guards, then go
through the door to the
left of where you
entered. Turn left down
this big hallway, all
the way to the end of
it, and through the door
to the left. Go through
this room, and then
you'll be in a
three-door barricade.
Once you open the third
door, be careful, an SS
is waiting for you at
the other end. Go around
the corner in this room
and pick up the Gold Key
and treasure. Then head
back to the big
hallway.
Now, head all the way
down the hallway again,
into the door at the end
of it. Shoot the guards
in this room, then go
through the door. You'll
run into a room with a
few doors to enter, and
some side corridors you
can't see down. There
are guards down every
corridor, and hen you
first enter the room
you'll get spotted.
Anyway, enter the door
straight ahead of you,
into the blue-brick
area. Head left into
that corridor. Go
through the locked door
at the end of it, and be
careful in this room.
There are guards all
around it. I suggest
running into the center
so they'll all see you,
then heading for cover
again, and shoot them
down. But, in any
situation, be careful.
You should see the
elevator.
3.5.2
Level 2
DESIGNER:
John Romero
Yesireebob...Well,
there is a cool feature
in this level (but one
you don't have to see to
beat it). Its the
gauntlet run of sorts
with all the SS. You
gotta run to
survive!
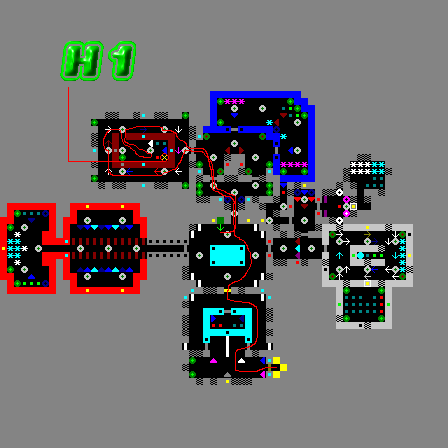
HOT-SPOTS
WALKTHROUGH
When you start, turn
left. Keep turning until
you see the opening in
the wall. Through it,
and enter the door to
the left in this small
room. Then, head into
the door on your left
again. Go any way around
this wood-wall island.
Enter it, grab the Gold
Key, then head back to
your starting
position.
Once you're there,
this time head around
the steel-wall island,
and into the locked
door. Turn left, then go
through the door here.
Turn left around the
corner here, and go into
the elevator.
3.5.3
Level 3
DESIGNER:
John Romero
Umm...

HOT-SPOTS
WALKTHROUGH
When you start, turn
left a little, and go
down that hallway, into
either of the two doors
you first see. Mow down
all the guards in this
room, and head across
the room into the door
in the left farthest
corner from where you
first entered. Turn
right around the corner
in this hassle, and into
the door at the end of
the hall to the right.
Grab the Silver Key.
Then, head back to your
starting position. If
you notice, the wall you
have your back to at the
start of the level is a
big island. Go behind
the island, shoot the
SS, and go through the
locked door, into the
elevator.
3.5.4
Level 4
DESIGNER:
John Romero
This level has a
guard and a dog in every
room, guaranteed. It
looks simple to beat,
but how far from the
truth that is...

HOT-SPOTS
- H1
- GK
- H2
- A secret lies here
that is full of
health, ammo,
treasure, and a
Chaingun.
- H3
- SK
WALKTHROUGH
From your start
position, go straight
forward into the door
you see. Go through this
hall, and into the
blue-wall area. Turn
left this this small
room, through the door.
Then, through this room
into the red-brick area.
Grab the Gold Key here.
Also, if you want, push
the eagle banner in here
to enter a secret room
with a bunch of goodies.
Leave the red brick area
from the opposite way,
or through the other
door. Turn left and head
down this hall, into the
blue-wall area. Head
directly forward in this
room, through the door,
then into the locked
door in this room. Get
the Silver Key. Then,
continue around the
outer rim of this level
(use the map for the
path) until you get to
the other locked door.
Then enter the
elevator.
3.5.5
Level 5
DESIGNER:
John Romero
Have you noticed a
slight pattern in John
Romero levels?
Hmm...
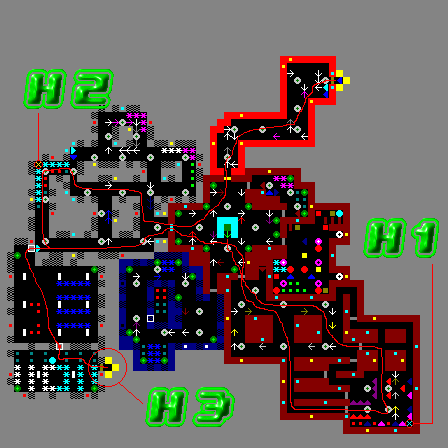
HOT-SPOTS
- H1
- SK
- H2
- GK
- H3
- Take the another
path in secret areas
to head to the secret
level.
WALKTHROUGH
When you start, you
should be facing two
doors. Head into the
left door. Turn left in
this room at the sort of
split, then right,
through any door you
see. This room should be
packed with guards. Mow
them all down, and grab
the Silver Key. Then,
head back to your
starting point.
While you are heading
back to the point, you
should see a locked
door. This is to the
right of your starting
point when you first
start. Enter this door.
You should be at a place
where you can go two
ways. Head left. Go down
to the end of the
hallway. Here you can go
two ways. One, right to
grab the Gold Key; two,
push a wall in the
corner here to go to the
secret level.
Heading right to the
key, grab it, then head
back to the room where
your starting point is.
When you first enter the
room this time, turn
left here and head into
the other locked door.
Go down the red-brick
hallway here, and into
the elevator.
If you decided to go
to the secret level,
when you enter the
secret, you'll be in a
large room with columns.
Grab the stuff if you
want, then push the red
swastika banner at the
back of the room to open
the other secret, with a
Chaingun, ammo, and
treasure. Then, enter
the elevator.
3.5.6
Level 6
DESIGNER:
John Romero
I'm about to put no
level comments in levels
that need none.

HOT-SPOTS
WALKTHROUGH
From your starting
point, turn right,
around the corner. Go
down the hall here, and
into the door with the
columns and banners next
to it. Go past this
room, through the door,
and into the door to
your right here. Then,
turn right, into the
windy corridor here. At
the end of it lies a
small room with the Gold
Key. Grab it, and head
back out of the
corridor. Turn left into
the door, and then
across this room, into
the door with the eagles
around it, then left
into the locked door. Go
through this tiny
corridor, into a small
room with the Silver
Key. Then, head back to
the other locked door
you may have seen while
getting the Gold Key. In
this room, head straight
across it, into the
red-brick area and
locked door. Go to the
end of this hallway, and
into the elevator.
Beware of the officer in
it, though.
3.5.7
Level 7
DESIGNER:
John
Romero?
Standard affairs.

HOT-SPOTS
WALKTHROUGH
When you start, you
many wanna turn right
around. A machine gun
lies just behind you.
Get it if you've died or
something. Ok, now,
leave the corridor
you're in, and the room
should be larger and
cross-shaped. Turn left,
around the corner behind
you, and into any of the
two doors here. Go
through this room, and
mow down the wall of
guards. Grab the Gold
Key, then had back to
the big cross-shaped
room.
Run across this room,
to the wing opposite
you, and enter the
locked door off to the
side there. There should
be three hallways in
this room. Go down any
one of them. In the room
you enter, mow down the
guards and grab the
Silver Key. Then, head
back to the cross-shaped
room. Enter the wing to
the left of you here,
the one where you
started. Go into the
door here, and into the
red-brick area. Be
careful in this room
with the multiple doors,
there's an SS behind
most of them, and when
you fire your gun,
you'll alert them all.
Once you've killed them
all, enter any of the
doors, then enter the
locked door in this
room. Turn right, go
down the hall, and enter
the elevator.
3.5.8
Level 8
DESIGNER:
Tom Hall?
This is the last
stand before you have to
take on Ms. Grosse. Oh,
how the elevator taunts
you, being so close, yet
so impossible to
get!

HOT-SPOTS
WALKTHROUGH
You start in a
hallway that takes you
around in a spiral. Get
through it, and to the
main hall here, where
the elevator lies behind
the berrels. Go up to
the triple-door split.
Enter the door to your
left. In this room, just
into the door ahead of
you (or any other door
for that matter).
Explore this room until
you find the door. Enter
into a room with guards,
and the Gold Key. Grab
it, and head back to the
triple-door split.
Go directly forward
instead of left here. In
this room, turn around
the corner to the right,
and enter the locked
door. Go any way you
want at the split here.
Once you get to the big
part of this room, mow
down the guards and grab
the Silver Key. Then,
head back to where you
saw the elevator, and
enter the locked door to
the right of it, then
into the elevator.
3.5.9
Gretel Grosse
DESIGNER:
John Romero
Finally. The floor
where the Giftkrieg
plans are located. And,
where Gretel Grosse
protects them with her
life. Oh, and have you
noticed my walkthroughs
getting slightly
shorter?

HOT-SPOTS
- H1
- Gretel Grosse
awaits you!
- H2
- Once you've killed
them all, its the
plans for you!
Yeah!!!
WALKTHROUGH
Go straight when you
first enter the level,
into the room loaded
with health. Don't worry
about ammo right now. Go
through any of the three
doors here, and then
directly right or left,
then straight, into the
door you see. NOT the
door to the right that
you see. In these two
rooms are the ammo
stashes. Then, leave the
rooms, and head for
Grosse.
GRETEL
GROSSE
To defeat her, use
the hide and shoot
technique. Hide behind a
wall when she shoots,
then shoot her up when
she's not. Remember to
grab health and ammo
from the rooms of
needed. Also, if you
need a Chaingun, head
into a secret room from
one of the walls of the
big room. (Use the map.)
Eventually, you'll kill
her.
Once you do, grab the
Gold Key she drops, and
head into the locked
door you may have seen.
If you thought the
battle was over, you're
dead wrong. A load of
other troops comes in
here. Shoot them down,
then turn the corner,
and run for the
plans!
3.5.10
Secret Level
DESIGNER:
John
Romero?
This is a secret
level that actually
comes close to being a
slightly normal
level.

HOT-SPOTS
WALKTHROUGH
When you start,
you'll be faced with
three doors. Head into
the left one. At the
cross, turn right and go
into that door. Go
straight across here,
into the door, and into
the long corridor. When
you come up to the door
on your left in the
corridor, enter it, and
grab the Gold Key. Then
leave and continue
through the corridor. At
the end of it, enter the
door, and turn left in
this room, through
another door. You'll be
back at the cross. Turn
right here, and go into
the door. Then, right
again in this room. Go
through the small
corridor here, and enter
the locked door when you
come to it. Grab all the
goodies, and enter the
elevator.
3.6
Episode 6:
Confrontation
Gretel Grosse
the giantess guard has
fallen. Hope her
brother, Hans, doesn't
get mad about this....
Now rush to
the military
installation at
Offenbach and stop the
horrible attack before
thousands die under the
deadly, burning clouds
of chemical war. Only
you can do it, B.J.
You must now go to
the installation and
kill General
Fettgesicht! Get ready,
it'll be no easy ride
from here on out.
3.6.1
Level 1
DESIGNER:
Tom Hall?
Your first level. The
big part of this level
(the blue-stone part) is
quite strange if you ask
me. Very hard to run
through it without
dying.

HOT-SPOTS
- H1
- The secret here has
a machine gun in it,
if you want it.
You'll need it to get
through this
episode.
WALKTHROUGH
When you first enter
the level, turn left
into the little
side-corridor there, and
get the ammo. Then head
back out and go into the
door on the right side
of the room. Keep going
past the door to your
right in this room, into
the door ahead of you.
Now you'll be in a long
hallway. Be very careful
here. There are officers
in almost every single
side hidey-hole. I
recommend slowly
approaching each one,
then backing up after
the guard sees you, and
then killing him when he
comes for you. There is
also a secret room in
the second one to the
left that you can open
that has a matchine gun,
that you'll need in this
level. Anyway, follow
the path out of this
section of the
level.
Once you're out of
it, you'll be in a room
with a bunch of berrels
in it. Go around the
berrels, but be careful
of the officers at the
end. Some of them in the
room ahead of you may
hear, too. Once they're
dead, head into the room
where some of them
previously were, and
from there head into any
of the two doors you
see. Turn left in the
corridor here, and go to
the end of into the
red-brick area. This
area is a very long one,
so just keep going until
you finally reach the
end of it. At the end,
there should be a door.
Enter this door, then
head right, and into the
elevator.
3.6.2
Level 2
DESIGNER:
Robert
Prince
A strange one from
the musician and
sound/fx person of Wolf,
Robert Prince. The main
part of the level is in
like, layers.
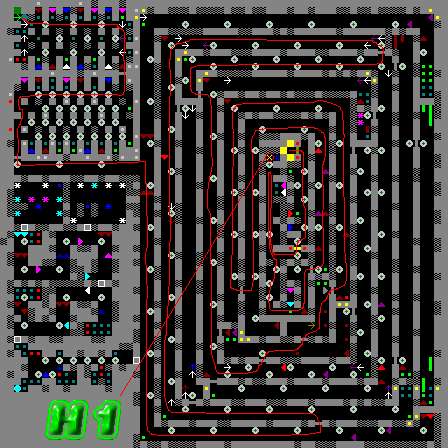
HOT-SPOTS
WALKTHROUGH
When you first start
out, you'll be in a
strange room with many
wall block islands
around. Get
through it any way you
want, but be careful of
guards that can sneak up
on you from behind. When
you find the door, and
enter the second room,
you'll find this room is
pretty much the same.
Get through it like
before.
When you leave the
room, you'll be in a
hallway that splits off
at the end. Turn left
here. Keep going down
the hall, and around the
bend, into the first
door to your left. Turn
right here, and go down
the hall this way. Keep
going down it, until you
reach the end, and enter
the very last door to
the right. Then turn
right, go down the hall,
and enter the room at
the end of it. Then turn
right again. Go down
this hall until you get
to the second door to
your left. You should
see a door to the right
a little here, so enter
it. Go through the door
in this small hallway,
then go down this larger
one, all the way around
it, until you get to the
last door. Enter it,
then turn left. Go down
and around the hallway
here, and enter the door
at the end of it.Go
through these small
corridors, and grab the
Gold Key. Then enter the
locked door here, and
head into the
elevator.
3.6.3
Level 3
DESIGNER:
Robert
Prince/Tom Hall
You should recognize
the shape of this level.
This one consists of
many swastikas put
together. Cool, but damn
hard without guidance.
There are level clues
that can show you the
right path, but I'll let
you find them yourself.
;P

HOT-SPOTS
- H1
- SK
- H2
- Get the secret Gold
Key here to enter the
secret level.
- H3
- The secret elevator
that goes to level
10.
WALKTHROUGH
Enter the level. Go
around the corner.
You'll notice a locked
door here, and if you
want to go to the secret
level, remember it.
Anyway, turn left at the
crossings, and go
through the door in this
wing. (Notice the
berrels...) Go around
the corner here, and
turn left again at the
crossings, then enter
any of the two doors in
this wing. (Again, those
berrels...) Head
directly forward at this
crossings, and into the
door at the end of the
wing. Go through this
room, and through this
other one. Then enter
the corridor in the next
room. Go down this
corridor, and at the end
of it should be the
Silver Key. Grab it,
then head back to the
last swastika you were
in.
When you get to the
crossings this time,
head right, and through
the door in this wing.
Enter the door to your
left in this hallway,
into another swastika.
Head right at the
crossings, and into the
locked door in this
wing. Turn left here,
across the crossing, and
into the elevator.
If you wish to go to
the secret level, check
the wall for a secret
where the main elevator
is. Go through this tiny
system of secrets, into
a room, and then push
another wall for the
Gold Key. Then, head
back to your starting
point, and into the
first locked door you
saw in the level. Enter
a secret from this room,
and then enter the
secret elevator.
3.6.4
Level 4
DESIGNER:
Tom Hall?
Just another
level.

HOT-SPOTS
WALKTHROUGH
Enter the level. Go
through the door you see
on your right. Go
through this windy room,
and into the door at the
end of it. If you want,
in this room, there is a
secret with a Chaingun
you can get. If not,
just enter the door in
this room, and go
through this
diamond-shaped room.
Turn left into the door
in this small room, into
a triangular-shaped one.
Turn right here, and
enter the door in the
corner of it. This room
contains a number of
officers, so be careful.
Turn left in this room,
and enter the left door
to get the Gold Key,
beware the officers.
Once you get it, head
back to the
triangle-shaped room.
When you enter it, run
across to the other
corner. Enter the door
there, and turn right.
This room should split
into a T, with double
locked doors on one
side, and a single
locked on the other.
Enter the double locked
doors. Mow down the
officers, and take
either the doors on the
right or left side of
the room. Follow the
corridor and get the
Silver Key. Once you
have it, go back to the
room with the single
locked door and enter
it.
Go around the bend
here and enter the door.
You'll be in a small
corridor. Turn left just
after the corner does,
and enter the door
there. Then enter one of
the locked doors. Turn
left here, and go
through the corridors
until you get to the end
of it, and go through
the door. You'll then be
in a room with two doors
to chose from. Go into
the door ahead of you,
and in this room should
be a double door thing.
Enter either of them,
and in this room enter
the elevator. Beware the
SS.
3.6.5
Level 5
DESIGNER:
Tom Hall?
The last part of this
level makes it stand out
for me. And its the
reason for the only
Hot-Spot #4 in the
guide.

HOT-SPOTS
- H1
- Head into this
secret if you want,
to get treasure,
ammo, and a
Chaingun.
- H2
- GK
- H3
- SK
- H4
- The only H4 in this
guide. This part of
the level is a large
and long hallway. Run
through it FAST, then
turn around at the
end and blow 'em
away.
WALKTHROUGH
When you start,
you'll be in a room with
three doors to take. Two
of them are locked, so
don't worry. If you
want, you can open a
secret that's directly
to the right of you
here, that gives you a
number of goodies
including a Chaingun.
Enter the non-locked
door, and go through the
corridor into the main
room and get the Gold
Key. Head back to your
starting room. Turn
right here, and enter
that locked door. Go
either way at the split.
Go through the corridors
until you reach the main
part of the room, and
then mow down all the
guards and get the
Silver Key. Then head
back to your starting
room.
This time, turn right
again and enter that
locked door. Go through
the corridor. The main
part of the room has
some large wood-wall
islands in it, so go
around them to the
three-door split. Enter
the door in front of
you. You'll then be in a
small room with a
corridor going off to
the side. Enter it, and
go around until the
corridor merges into a
larger hallway. When you
get to the straight part
of it, the area where
there are many small
hideaways on each side
of the hallway, get
ready. Mow down the
guards you see in the
distance, then, RUN. Run
to the end of the
hallway, then flip
around and mow all the
guards down. (NOTE: This
is easier with a
Chaingun. :) ) Once
they're dead, head to
the end of the hallway
where the door is, and
enter it. Fight the
guards here, then enter
the elevator. (Caution,
guards are in it.)
3.6.6
Level 6
DESIGNER:
John Romero?
Another favorite of
Wolfenstein fans, this
one is pretty hard to
beat. The main reason
being is its strange
design that has large
hallway-type rooms that
are not split apart into
smaller rooms. One shot
means a guard in some
other part of the level
can come running.

HOT-SPOTS
WALKTHROUGH
This one will be hard
to walk you
through...but here goes.
Beware of guards all the
time here.
Enter the door when
you first start the
level. You should see
another door in front of
you, enter that one too.
Then enter the door you
should see to the right
of you a little. Then,
enter the other door you
should see to the right.
Turn right at this
hallway, then enter the
door you should see
right in front of you.
Turn right, then right
again at the split, into
the door. Grab the
Silver Key in this
room.
Then, head back
through the door you
came in on. Turn right
at the split again,
through the door, then
down the hall and turn
left, through that door,
then turn right around
the corner behind you,
and you should see a
locked door. In here,
run and snatch the Gold
Key, then head out
through the other locked
door. Head straight down
this hallway, through
the door ahead of you.
Then gradually go right
alot, down a hall, until
you see another locked
door. Enter it.
Turn right of course
here, then any direction
at the split. Go to the
end of this hallway, and
make a left, around the
corner, into the
elevator.
3.6.7
Level 7
DESIGNER:
Tom Hall
Obviously a large
maze in most of the
level. Hard to beat
without this guide.
:)

HOT-SPOTS
- H1
- GK
- H2
- Uh, oh...the Silver
Key is behind a
column! Of course,
you have to get to it
by secret.
WALKTHROUGH
Be careful in your
starting room. There are
a number of guards in
those hideaways to the
side. Get through them,
and go through any of
the two doors in this
room. Go down this
hallway, and into the
door to the left. You'll
be in a big room shaped
like a cross. Turn left
at the center of the
cross, down the hall,
and into the door. Grab
the Gold Key in this
room, and head back out
into the cross room.
Turn left in the center
of the cross here, and
into any of the two
locked doors. In this
room, you may notice the
Silver Key is behind a
column. There is a
pushwall next to the
column you can push to
open it up. Do so and
grab the key, beware the
SS. Then head back to
the cross, and head left
in the center of it
again.
At the end of this
hall is a choice between
two doors. Take the one
on the left. From here,
use the map to guide you
through the maze. Once
you get to the locked
door, enter it, mow down
the officers, and enter
the elevator.
3.6.8
Level 8
DESIGNER:
Tom Hall?
A very long level,
indeed, if you don't
know where any secrets
are.
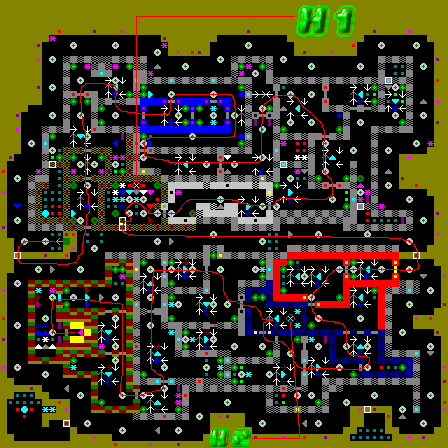
HOT-SPOTS
WALKTHROUGH
It seems like the
main hallway in this
level is neverending, if
you don't' know about
the secret shortcuts.
There is a secret on the
wall next to you in the
first part of the level.
Go through it, and head
around the corner into
the door. Go through
this room, through the
next, through the next,
and then turn right in
this room, around the
corner, into the door.
Head through this small
room, and into the room
with two doors. Go
through the one on the
left. Turn right and
head down the hallway.
Turn left around the
corner here, and go to
the end of the hallway
and through the door. Go
through this room, and
then through the next.
Turn right into the door
in this room. Then, turn
right again, and into
that door in the room
with two doors. Go
straight ahead here, and
into the door you first
see, and take a right in
this room, through the
door. You'll then be in
the room with the Gold
Key. Grab it. You may
notice a wall block
sticking out. Push in on
one of the sides, then
push the wall that was
behind it.
You'll be in the main
hallway now. Turn left
here, and head all the
way down it, and stop
before it bends left. On
the right wall here,
there should be a
secret. Open it. Then,
enter the locked door to
the right of you. Go
through this room, then
through the next. In the
room with the tripe
doors, enter any of
them. Leave this room
and then enter the first
door you see. Then enter
the door you should see
to your right a little.
Enter the door that
leads to the blue stone
area in this room, the
first one on your right.
Get the Silver Key in
this room, and exit the
opposite way you came.
Head into the door you
should see a little to
your right. Go through
this small room, then
take a left and go into
the door. Head right
into the first door you
see here. Turn right in
this room and head
through the door. Turn
right again, and enter
any of the two doors you
see. Go through the
other two doors here,
too. Take a left and
head into the locked.
door. Then, turn left
and around the corner,
finally into the
elevator. Brace
yourself...
3.6.9
General Fettgesicht
DESIGNER:
Tom Hall?
Ladies and Gentlemen,
if you thought for a
minute all levels in
this game have been
easy, well, you have not
met your match. This
LITERALLY puts all of
them to shame. I
actually saw treasure in
this level, and when I
saw it, I laughed my
head off, going
"Treasure? That stuff
was in the other levels.
Those other levels were
kids play! HAHAHA!" Yes,
this is, in all forms of
the word, really f*cking
hard.

HOT-SPOTS
- H1
- First things first,
enter this secret.
There are four major
health/ammo secrets
in this level, and
you need to open ALL
of them to survive,
but get this one
first, because its
got a Chaingun in it.
You'll need that
later.
- H2
- There are secrets
inside of each of the
steel-wall areas.
Open them both for
ammo and health.
- H3
- Here he is. The
second most powerful
boss, General
Fettgesicht. He's got
a nice little
Chaingun AND Rocket
Launcher waiting for
you. Although he
himself isn't too
hard to beat, its his
insane amount of
protection - the tons
of guards in the
level - that get to
be a hassle.
WALKTHROUGH
Ok, when you start,
mow down the guards in
this room. On the right
wall here, there is a
secret. Open it, and
fill up. Then, enter any
of the four doors you
see. Fire your gun, into
the open door, then run
back and mow down the
guards as they run into
the room. Once they're
all dead, enter the room
where they were, and you
can go two ways. The
door on the left side of
the room leads to a
larger secret. The door
on the right is the
same, but less of a
secret.
Whichever way you go,
be sure to mow down all
the guards. Once you get
through the room, you'll
be in the room where the
two paths meet again,
and then merge into one
door. That door is
Fettgesicht's chamber.
DO NOT ENTER IT UNTIL
YOU HAVE ALL GUARDS
WIPED OUT SO FAR. There
are always a few SS
lurking around still, so
make sure you beat them
ALL, then go back to the
secrets you've opened
up, and fill up.
Finally, head into the
General's chamber.
When you first enter
the door, you'll be in a
small corridor. Go
through it, and you'll
end up in a much larger
room. Use the map, or
look for a secret on the
right wall there. This
is your lifeline almost.
Use it to replenish
yourself. Then, head
into the middle of the
room, where Fettgesicht
is.
GENERAL
FETTGESICHT
Ok, first and
foremost, don't kill him
yet. Just make sure he
sees you, then kill ALL
the guards in this
chamber. And I do mean
ALL. There are a few
guards hiding in tiny
corridors to the side,
so be sure to kill them,
too. Once all of the
guards are dead in the
entire level, you're
ready to take on the
General.
To attack, you can
use your simple
hide-and-shoot method.
Hide behind a wall
island there, and after
he finishes shooting,
tear him up. You can
also just be out in the
open the whole time, and
strafe from his rockets.
DO NOT get cornered by
him, so spend minimal
time in secrets. Once he
dies...um, he dies.
 The
General gasps his last
breath, and the free
world is safe from the
terrifying Nazi chemical
war. You return to
Allied Headquarters, a
Medal of Honor waiting
for you. The
General gasps his last
breath, and the free
world is safe from the
terrifying Nazi chemical
war. You return to
Allied Headquarters, a
Medal of Honor waiting
for you.
Allied command
informs you of some
nefarious activities
around Castle
Hollehammer. Something
about some gray-skinned
berserk soldiers....
3.6.10
Secret Level
DESIGNER:
Tom Hall/John
Romero
This is one of my
favorite levels. I dunno
why. Its almost like
four levels in
one...Kind of a "Lost
Level" or something.

HOT-SPOTS
- Hot-Spots? You've
got to be
kidding...
WALKTHROUGH
Heh, just play. There
are three sections to
the level that can get
you out, and one that
can lead you to, oh,
around 4 extra lives.
Use the map to get you
through.
Wolfenstein
3-D, Spear of Destiny,
and the id logo are are
trademark and copyright
1992, 1993, and 1998 id
Software. All rights
reserved. All other
names and products are
copyright and trademark
of their respected
owners.
This guide
copyright 2000-2002 The
Master, all rights
reserved.
Jump
to the
top
|
