OK, this tutorial will teach you how to make
good enemy sprites in Wolf3d without using many colours and still looking
detailed.
Keep in mind that it’s easy to draw this way,
but still requires a lot of practice and patience.
You can use any paint program you’re comfortable
with.
1) Start by defining what type of enemy you want to make, is he going to be
a soldier, a cowboy, a gangster?
If
you’re good at drawing in paper, maybe you can make a sketch to guide you
through the rest of the process, if not, at least keep a good mental image of
how he should look like.
I’m
a big fan of Steven Seagal (his earlier movies though) so that’s why I’ll make
him an enemy in this tutorial.
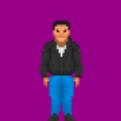
Take
a look at the finished sprite:
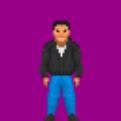
Does it look like him? For a Wolf3d sprite I guess so
(Ponytail included J).
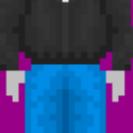
2) Now define the sprite’s general appearance:
You
can draw only half and then copy and invert it thus giving symmetry to the
model (=good thing).
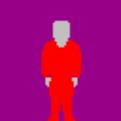
The clothes in one colour, and the skin in other. (If
you want you can use more colours)
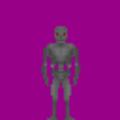
3) Let’s pass on to the real colours the sprite will wear:
For
that you need the Wolf3d palette
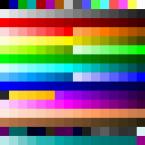
I
chose the colours Steven Seagal wears in his films (black jacket and light blue
jeans). Now paint your ‘red’ model with the new colours.

Starting to look good? Not yet, but just wait.
4) Time to add shadows and lights:
This
is the trickiest part and requires a lot of attention:
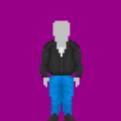
Better, huh?
Notice
how I modified his arms. This is because he’s not a guard and making him stand
firmly with his arms parallel to his body would have looked incorrect.
Close up
I
generally use four colours for clothes. The darkest one for details and to
separate torso from arms, one leg from the other etc.
Then
I use the others to apply shades.
Shades
are not straight lines but more ‘random’ ones so to give the appearance of
wrinkles.

Compare the pants in both pictures, see the
difference?
5) You think clothes were hard, well skin is harder.
Skin
has to use more colours to look right. It would be a shame to ruin your sprite
with just a plain colour skin.
Anyway
start out with base colours:

Yeah, I know it looks funny.
Now
apply some expression to his face.
I’ll
tell you a little trick, by painting darker squares above his eyes you can
define his mood.

See? Squares on top and to the inner side and he looks
really angry.
And yeah, I know it still looks funny.
Keep
applying colours (can’t really help you there, it takes practice) until it
looks something like this:

Now he looks fine.
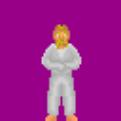
Now
your creation should look like this:
In
my case I didn’t like his legs much, so I spread them a little bit. So it
looked more natural:

Here’s our sprite in its finished form.
Here
are some other samples of sprites I made:


Clint
Eastwood fan? Or Lee Van Cleef’s? He’ll be back
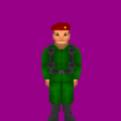
Soldier ‘Sanitarium
zombie’
Hope you liked this tutorial and sorry for my
‘funny’ English. I’ll try to make a 1st person weapons tutorial in
the future.
Oh and:
Please
don’t use these images for any projects without asking me first.
Matt.